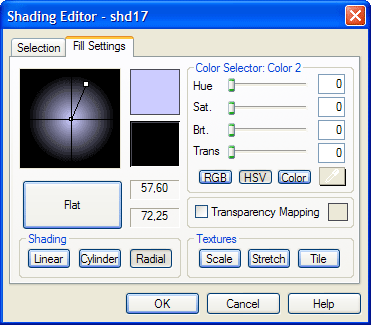
On the Fill Settings Tab, choose colors, textures, and effects to apply to your shading component.

Choose colors, fill textures, and effects to apply to a shading component using the Fill Settings Tab of the Shading Editor dialog box.
Controls on the Fill Settings Tab of the Shading Editor dialog box include the following:
| Field/Control | Description |
| Thumbnail View | Displays a preview of editing operations. With gradient effects selected (i.e., Linear, Cylinder, or Radial), allows you to modify rate of change. |
| Color 1/Bright | When in RGB mode, click
to select the base color using either the Red, Green, or Blue controls,
or the Color button or Color Dropper tool. When in HSV mode, click to
alter the hue, saturation, and brightness of the base color.
When the shading component is based on an image or pattern (and not on colors), click the Bright button to adjust the image brightness along the Red, Green, and Blue channels. |
| Color 2/Contrast | When in RGB mode, click
to select the complementary color using either the Red, Green, or Blue
controls, or the Color button or Color Dropper tool. When in HSV mode,
click to alter the hue, saturation, and brightness of the complementary
color.
When the shading component is based on an image or pattern fills (and not on color fills), click the Contrast button to adjust the image contrast along the Red, Green, and Blue channels. |
| RGB | When you are working with a color fill (not image or pattern fills), click to enter RGB mode to adjust the Red, Green, and Blue channels of the color fill. If you are working with an image or pattern fill (and not a color fill), you will be working automatically in RGB mode. |
| HSV | Available only with color fill selection (not image or pattern fills). Click to enter HSV mode to adjust the Hue, Saturation, and Brightness intensities of the color fill. |
| Red/Hue | When you are working
in RGB mode, click and drag the slider left or right to adjust the Red
channel of the selected shading. Or, you may enter a value in the field.
When you are working in HSV mode, click and drag the slider left or right to adjust the Hue intensity of the selected shading. Or, you may enter a value in the field. (Default value is 0.) |
| Green/Saturation | When you are working
in RGB mode, click and drag the slider left or right to adjust the Green
channel of the selected shading. Or, you may enter a value in the field.
(Default value is 255.)
When you are working in HSV mode, click and drag the slider left or right to adjust the Saturation intensity of the selected shading. Or, you may enter a value in the field. (Default value is 0.) |
| Blue/Brightness | When you are working
in RGB mode, click and drag the slider left or right to adjust the Blue
channel of the selected shading. Or, you may enter a value in the field.
(Default value is 255.)
When you are working in HSV mode, click and drag the slider left or right to adjust the Brightness intensity of the selected shading. Or, you may enter a value in the field. (Default value is 100.) |
| Color | Click to open the Color dialog box and select a system or custom color. When you are finished, the values of the selected color will appear in the Red, Green, and Blue fields. You may use this function to pick colors for Color 1, if you are creating a flat color fill, or for both Color 1 and Color 2, if you are creating a color effect fill. |
 |
The color dropper performs
two functions:
|
| Lock | Available only when image object is selected. Click to lock the Red, Green, and Blue sliders, and to activate the Brightness and Contrast controls. Use the sliders in either Brightness or Contrast mode to adjust these settings along the Red, Green, and Blue channels. |
| Transparency Mapping | When you are using an
image fill, click to checkmark to enable transparency. The color appearing
in the Transparency Mapping setting window (to the right of the option
box) will be rendered transparent in the selected shading component.
The transparency in image mode and shading mode work differently. In shading mode: The transparency slider affect the selected color That is, color 1, color 2 or transparency color whichever button is depressed. If color 1 or 2, the transparency slider makes that color transparent to the amount selected (0 = no transparency, 255 = full transparency) So if you have a two color gradient and one color is fully transparent, the gradient will fade into transparency. Transparency mapping in shading mode means that, when the transparency color is selected, each of the red, green and blue channels can be made transparent to varying amounts from 0 = none to 255 = full as the respective slider is moved. The transparency slider, when the transparency color is selected, adjusts the general transparency of the shading. For tile, scale and stretch modes, The image mode below applies for transparency mapping. The transparency slider currently has no effect on color 1 or 2 in these modes. In image mode: The transparency slider value is the same whether brightness or contrast is selected. It affects the general transparency of the image from 0=none to255= full. Transparency mapping means that any pixel that matches the transparency color will be made 100% transparent. When the transparency color is selected, the transparency slider increases the range of the Transparency mapping color. In other words, if the transparent color is pure blue and the trans slider is 0, only pixels matching pure blue will be transparent. As the slider is moved up more shades or blue are made transparent, then other colors, then eventually, at 255, all colors are made transparent. |
| Transparency Setting Control | After enabling Transparency Mapping, click to set the color dropper to pick up a color to be made transparent. (Or, you may select a transparency color using the Red, Green, Blue sliders or fields.) When you are finished, the control will display the selected transparency color. |
| Flat | Click to cancel any color effects (Linear, Cylindrical, or Radial) and apply only the 1 (base) color to the fill. |
| Linear | Click to apply a linear shading pattern between the base (Color 1) and complementary (Color 2) colors. Linear shading appears as one color blending vertically into the other color from left to right. You can change the transition point of the gradient using the controls in the Thumbnail View window. |
| Cylinder | Click to apply a cylindrical shading pattern between the base (Color 1) and complementary (Color 2) colors. Cylindrical shading appears as one color blending horizontally into the other color at both the top and bottom. You can change the transition point of the gradient using the controls in the Thumbnail View window. |
| Radial | Click to apply a radial shading pattern between the base (Color 1) and complementary (Color 2) colors. Radial shading appears as one color blending radially from the center into the other color. You can change the center point and the radius of the gradient using the controls in the Thumbnail View window. |
| Scale | Click to display the Open dialog box to browse for an image file to apply to the shading. The image fill will be scaled to fit the dimensions of a geometry while maintaining aspect ratio. |
| Stretch | Click to display the Open dialog box to browse for an image file to apply to the shading. The image fill will be stretched to fit the dimensions of a geometry. |
| Tile | Click to display the Open dialog box to browse for image files to apply in a tiled (repeated) pattern to the shading. Generally, smaller image files work best; however you may discover some interesting effects by tiling large image files. |
| OK | Click to accept the current settings and exit the dialog box. |
| Cancel | Click to cancel the operation and close the dialog box. |
| Help | Click to open a context-sensitive help topic. |