If you have selected the My Web Host (FTP) option on the Profile Tab of the Publisher dialog box, you can upload your project to your web host using the FTP Tab of the Publisher dialog box.
You will need to obtain connection and login information from the third-party web host in order to use SiteSpinner® Pro to upload your project files. Your web host should provide you with your user login name, user password, FTP host name, and starting (remote) directory.
Enter information on the FTP Tab only if you are using FTP (File Transfer Protocol) to upload your published project to a third-party web host. It is not necessary to use the FTP Tab if you are publishing your project to your own computer or web server.
Enter information on the FTP Tab of the Publisher dialog box if you are uploading your published project to the web server of a third-party web host.
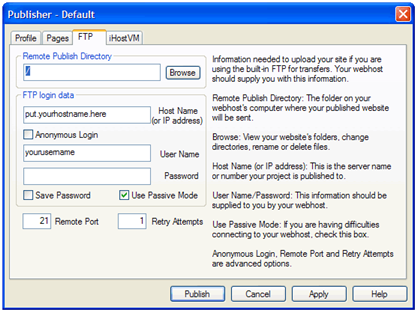
The FTP Tab on the Publisher dialog box includes the following controls and fields:
| Control/Field | Description |
| Remote Publish Directory | Enter the path to the publish directory on your third-party web host’s computer. Or, if you have entered the necessary FTP login credentials, you can click the Browse button to connect to your web host’s web server and browse for the publish directory. This is directory on your web host’s web server to which you transfer (upload) your web site. |
| You must have an active Internet connection in order to FTP your project. | |
| Browse | When you have entered the necessary FTP login credentials, click to connect to the remote FTP server. Once connected, click to map a path to the publish directory on your web host’s FTP server. |
| Host Name (or IP Address) | Enter either the FTP host name (e.g., ftp.yourfavewebhost.com or www.yourfavewebhost.com) or the IP address (e.g., 123.33.22.1) of your web host’s FTP server. |
| Some web hosts require an IP address, others require a domain name, and many will accept either. If you are not sure, contact your host’s technical support representatives. | |
| User Name | Enter your FTP host user name. For more information, see Publishing Remotely. |
| Password | Enter your password to log in to your web host’s FTP server. For more information, see Publishing Remotely.” |
| Anonymous Login | Anonymous logins are rarely used for web site hosts. Click to checkmark to disable the User Name field and enable you to login anonymously to your web host’s FTP server, if you are allowed to do so. (Anonymous logins usually require that you enter your e-mail address as your password.) |
| Auto Backup Project File When Publishing | Click to checkmark to save the file upon publishing. If you have selected to upload your project to your web host via FTP, your project file (*.ims) but not your images or other media will also be copied to the server. Recommended. |
| Save Password | Click to checkmark to allow you to store your login password between FTP upload sessions. Click to un-checkmark to enter your password each time you log in to your web host’s FTP server. |
| Stored passwords are not encrypted and are only as secure as access to your computer’s files is. | |
| Use Passive Mode | Click to checkmark to attempt a passive-mode connection to your web host’s FTP server, if you are having trouble connecting. |
| Passive mode is required for some internet connections and optional for others. Often broadband connections and connections through routers require it. If your connection is not working or is intermittent, try switching Passive mode on or off. | |
| Remote Port | Enter the port number on which your web host’s web server listens for FTP connections. The default port number is 21. Most servers use this port number. |
| Web servers typically use port 21 for FTP connections; however some firewalls block this port for security reasons. Check with your web host if you think the Remote Port information needs to be changed. | |
| Retry Attempts | Enter the number of times to retry establishing an FTP connection if the first attempt fails. The default is 1. The retry count is also used for each file transfer. So if a file fails to upload, it will be attempted again until the retry count is reached. |
| Publish | Click to save publishing information, begin publishing the project, and exit the dialog box. |
| Cancel | Click to exit the dialog box without saving publishing information or publishing the project. |
| Apply | Click to save all publishing information without publishing the project or exiting the dialog box. |
| Help | Click to open a context-sensitive help topic. |

