Use the Pages Tab of the Publisher dialog box to select the pages of your project you would like to publish, make changes to file names or extensions (if required), specify a directory on your computer to publish to (when publishing locally or when publishing to your own web host via FTP), and determine file path and upload options for images and other media.
Select pages to publish and set references to your resource objects using the Pages Tab of the Publisher dialog box.
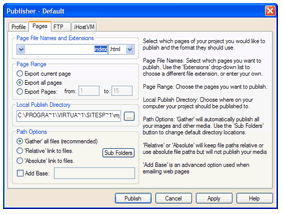
The Pages Tab on the Publisher dialog box includes the following controls and fields:
| Control/Field | Description |
| Page File Names and Extensions | The first drop-down
menu contains the names of all pages available in the project. The second
drop-down menu contains a list of extensions available in the current
publish format (HTML or SVG).
You may accept the default extension for each page in the project, or you may select a page from the first drop-down menu and then assign it a different extension by selecting an extension from the second drop-down menu. Choose either .html, .htm, .asp, .shtml, .cgi, .php, .asp, .pl. Or, you may enter your own extension if it is not listed. |
| By default, SiteSpinner® Pro assigns page names as: Index, Page1, Page2, Page3, etc. You may rename a page, up to 40 alphanumeric characters, by typing over the displayed name in the Page File Names and Extensions box. Avoid using special characters, such as “ ~ ! @ # $ % ^ & * ) { } [ ] : ; ’ < , > . ? / “. | |
| Page Range | Click a radio button corresponding to the set of pages you wish to publish. Choose either Export All, Export Current Page (i.e., the page displaying in the Work Window), or Export Pages and then enter a range of pages from the project. |
| Local Publish Directory | Displays the location path of the directory on your system to which your project will be published. You may edit the path to map to a different location, if desired, or click [..] to display the Browse for Folder dialog box, allowing you to map a different path. |
| When you are publishing using the Relative Link to Files option (see Path Options, below), the path relationship between the Local Publish Directory and any referenced resource files (e.g., images, audio, etc.) will be used to construct the relative file path. It is consequently important to ensure that the relationship between this directory and the resource files will match the same relative paths on the remote server. To avoid having to do this, use the Gather All Files option. This will gather and place all of the files correctly for you. | |
| Path Options | Click a radio button corresponding to the type of path that will be used to reference resource files in the publish directory. Choose from Gather all files (recommended), Relative link to files, or Absolute link to files. For more information, see Resource Files. |
| If you have chosen the My Web Host (FTP) export destination option on the Profiles Tab, you may not choose the Absolute link to files option. | |
| Sub Folders | Click to open the Publisher Sub-Directories dialog box, allowing you to change the directories or directory names that resource files are published to. Sub folder can be a single name which will become a sub folder of the location where the html/svg file is placed (the root). Leaving it blank will mean no sub folder, files in that category will be placed in the root. |
| Add Base | Click to checkmark to enable the use of a published page as an email or as a newsletter template, and then enter the domain name of the host server to which you have published the page. This adds the <BASE HREF = > tag. This will mean that when the HTML page is viewed, all images etc will be retrieved from the specified server no matter where the page itself resides. Add Base is used when you want to use the webpage as an email or as a newsletter template. It tells the HTML to look to your server (the base) for all images and external files. For more information, see Export Progress Dialog Box. |
| Publish | Click to save publishing information, begin publishing the project, and exit the dialog box. |
| Cancel | Click to exit the dialog box without saving publishing information or publishing the project. |
| Apply | Click to save all publishing information without publishing the project or exiting the dialog box. |
| Help | Click to open a context-sensitive help topic. |

