SiteSpinner Tutorials banner
Virtual Mechanics Logo
SiteSpinner
®
Publishing Your Project

See first: The Big Picture: Publishing your project.

In this tutorial, we cover:

What is publishing?
Your home page
Open the publisher
Setting a profile (Profile tab)
Auto clean project file
Auto backup project file when publishing
Editing profiles
Pages tab
Gather
Sub folders (or sub directories)
Publishing to a local directory
Publishing to your web server
FTP tab
Browse your site
Publish and export progress
Why can't I browse my site?
Firewall
Invalid Host, User Name or Password
Invalid Host Name
Poor connection
Try to connect another way
Why can't I publish to my web host?
Try to publish another way


What is publishing?

A web page is located on a host computer that may be anywhere in the world. This host will hardly ever belong to you and must be protected from unauthorized access. In order to transfer your files to this computer you must be able to identify its location and prove that you have permission to access it. Just to make life more difficult (!), hosts use differing computer operating systems and server software.

SiteSpinner includes a Publisher with an FTP (File Transfer Protocol), capability that will convert your project to HTML in a local directory (folder) on your computer. Then, if you require, it can also copy it to your web site which is a directory on your remote host computer.

The Publisher includes a Gather Option to create the appropriate paths to any referenced files such as images or audio, and then to transfer them to the destination folder.

Once you have entered the correct information for your first publish, SiteSpinner can save your settings. To update your site, you can publish again with a simple click of the Publish button.

if you have more than one web site or extra publishing requirements, SiteSpinner can  create multiple publish profiles. A profile is a list of settings you need for a particular project.

SiteSpinner logo
Publish button
Your home page

A home page is the page a visitor will first see when visiting your site by entering your URL. On most sites, this page is called:
Some sites may use a different name, but most will allow you to use any one of these names. If your host recommends something, use that. SiteSpinner uses index.html as the default, so if in doubt, try that first.

A full URL to a web page normally includes the page name. But for home pages, we adopt a convenient shortcut -- links to home pages don't need to include the name of the first page. These two links are equivalent:
http://www.VirtualMechanics.com/index.html
http://www.VirtualMechanics.com

SiteSpinner automatically generates simple names for the pages in your project -- index, page2, page3, etc. Apart from the index page, you should normally rename pages to something more meaningful. One such place to do this is in the Publisher > Pages tab.
Open the publisher

Open the publisher by:
Publish button
Setting a profile (Profile tab)

A profile is a list of settings you need for a particular project. When you are just starting out, there is one called "default" that you can use. But as you become more ambitious, with multiple projects, you need individual settings for each project and site. These are called "profiles" -- here's how to set one up:

Select the Profile tab. Click the New button and give your profile a unique descriptive Profile Name.  You can have up to 99 profiles.

The rest of these instructions apply to either the default profile, or your chosen profile.

In the Export Destination section, you have these choices (depending on your program version, there may be others):
Leave the Publish Format set at HTML.
Publisher Profile tab
In the Options section, leave both checkboxes checked.


Auto clean project file

Auto Clean deletes remnants of old objects that are no longer used. If you want to keep remnants for later use, uncheck this box. Ordinary folk don't need to keep them, so we suggest leave the box checked. An equivalent of this option is Edit > Clean Components.


Auto backup project file when publishing

Your .ims project file is an important file -- if you lose that, you lose your project. For this reason, SiteSpinner tries to protect you from disasters by copying your project file with every publish.

For larger projects, this file can exceed 1 MB in size, so you may not want to spend the time it takes to upload. In this case, turn auto backup off -- but make sure you back up your project some other way. See the Backups tutorial.


Editing profiles

Any changes you make to the Profile tab or the other tabs will be saved against your profile (or the default profile if you have specified no profile). In future, before publishing, set the profile you want from the drop-down Profile list box. You can edit your profile too -- if you are not publishing immediately, click "Apply" to apply your changes to the current profile.

Publisher buttons
Pages tab

The Page File Names and Extensions drop-down boxes boxes display the file names of each page with the extension that SiteSpinner will create. You can enter a new name for each page and select a different extension if you wish. Renaming pages here has the same effect as renaming them in the Page Editor.

Normally, you won't change anything in this section.

In the Page Range section, select the pages you want to publish. Once you have selected a range, confirm that you have all the pages you expect by clicking the drop-down list box for Page File Names.  In the Page Range list box there is also an option to publish only the current page -- this makes it convenient to update just one page of your site.

Use the Local Publish Directory to select a local directory (folder) for the published project. SiteSpinner will always place the published files in this directory. If you are using SiteSpinner to upload to your host, it will FTP to your host from this directory.


Publisher Pages tab
Page Editor Button
To browse to a new directory, click the ellipsis ( ... ) button to the right of the directory name.

After you publish, you can browse this directory (say, with Windows Explorer) to see exactly what files have been published -- sometimes there can be surprises! E.g., huge files, or many duplicate images.

Use the Path Options section to select Gather or Relative mode. We recommend you leave this set to Gather to start with.


Gather

Gather collects all the files for your project such as images, audio and scripts, then copies them into the publish directory. If you require, it will then FTP them to your host. This is the safest option with the least risk of missing files. Since the published code keeps file paths all relative to current directory, you can move the whole published project to another location, and it will still work. See also: Relative URLs.

As you gain experience, the Relative option is also reasonable. For more information, click the Help button in the Publisher window. For this option, you do the gather manually, but it gives you more control.


Sub folders (or sub directories)

Clicking the Sub Folders button in the Pages tab and then checking the Use More Categories checkbox will produce a window like that below. This window shows the common file types and the default folders where SiteSpinner will place them. Normally these will be just fine, but once in a while, you'll want something different. If so, change them here.

Publisher Sub-Directories
If you have a blank sub-folder, files of that type will go to the root folder -- the top level folder of your site. If you had any Publish Files included as Import Objects, they are "External Files" here. See also the Import Object tutorial: Format Type vs Publish Folder.


Publishing to a local directory

If you have chosen "Files On Disk" as your Export Destination on the Profile tab,  you can now press the Publish button to export your project to the Local Publish Directory on the Pages tab. If you will later move or FTP the exported files yourself, we suggest that you start with an empty directory. After publishing, this directory will then contain all the files related to the project. (And if you are well organized, only the files related to the project!)
Publish button
Publishing to your web server

In order to FTP directly to your web site (also called web server or web host) you will need to know the permissions and procedures that your hosting company expects you to use. Most ISPs (Internet Service Providers) will expect you to enter a User Name and a Password. You will also need to know the IP address for the server and the directory that your files must be put into. This information varies from host to host. Some free hosting sites may not allow you to FTP directly to your web site or may require that you use their specialized procedures to upload your files. If you do not already know the procedure or don't have the required FTP information, contact your hosting company technical support.

Before you can publish, you need at least these important pieces of information:
We'll continue by assuming that you are publishing the Hello World project (2 pages) and that you have set up a profile called HelloWorld.

FTP tab

Put a forward slash in the Remote Publish Directory for now, or let SiteSpinner do so.

FTP login data

Host Name (or IP Address).
A Host Name is a unique identifier for a server on the Internet and is typically a main level domain name prefixed by ftp such as: ftp://virtualmechanics.com or
ftp.virtualmechanics.com.
 
An IP Address also identifies a unique domain and takes the form of four numbers separated by dots such as 216.245.125.55. Some web hosts require an IP address, others require a domain name and many will accept either. If you are not sure, contact your host technical support.

Either way, enter the Host Name or IP address as provided by your host.

Anonymous login
, restricts your options and  usually requires that you use your e-mail address. You don't want an Anonymous login.
 
Publisher FTP tab
Enter your User Name as provided by your host. This is the name you enter to log on to your server.

Enter your Password  as provided by your host. If you check the checkbox "Save Password", the password will be saved in plain text in your ftppro.ini file.


Browse your site

You should now be able to access your web site. Be sure you are connected to the Internet and select the Browse button next to the Remote Publish Directory box. If everything is set up correctly, you should see an FTP Server Directory dialog with your Remote Directory and a list of the files within it. If the dialog does not appear, see Why can't I browse my site?

FTP Server Directory
Destination directory blank (just a forward slash)
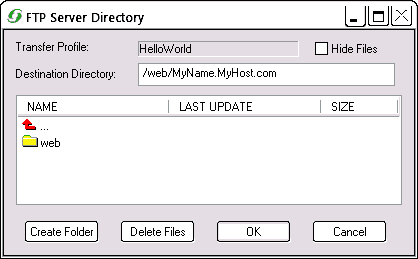
Although it does not look like it, you can resize this window in the usual way -- just drag the right hand edge or bottom.

Your window should look a little like the one above. In practice, you should have a few files and folders already there. There may be a file there called index.html (or .htm) or default.html (or htm). This will contain a simple message that your host provides for all new sites saying in effect: "Hello, this site isn't up yet".

If you see one of those files, you have found the right place and you are in the correct folder.

On some hosts, the directory that you start with may not be the directory you publish your project to. You can explore your host by selecting folders or the red up arrow. Navigate up or down the directories by double clicking on the red arrow or the folder. Try double-clicking the red up arrow until you can navigate no higher. If you find nothing better, the folder you arrive at is probably the one where you should put your site files. 

For our example, the folder of interest is called "web". But on your site, the folder may have a variety of other names like "httpdocs", "public_html" or "wwwroot". If there are multiple folders, it may not be clear which one you are to use for your site. If so, you'll need to explore each path in turn. We'll explore the only one possible here: "web" -- image below.

FTP Server Directory
blank
MyName.MyHost.com
This is starting to look more promising. Again in this simple example, there is only one place to go -- so double-click the folder now visible:
FTP Server Directory -- project published!
Project published!
This is the place we have been looking for. In practice, you are unlikely to find the two special files together like this -- expect to see only one. So this is the correct directory for your site -- the root folder.  Notice how the name of the path to this folder appears in the Destination Directory.

Click OK to accept the settings and close the FTP Server Directory dialog. This will automatically  transfer the path from the Destination Directory to the FTP Tab Remote Publish Directory.  If you know the path, you can enter it directly into the Remote Publish Directory edit box, but keep in mind that some hosts are CaSe sensitive. To avoid typos, it is best to browse for the directory as we have done, and allow SiteSpinner to make the setting.

In turn, this setting will form part of the profile for this project, after you click "Apply", or "Publish" using the profile.


Publisher buttons
Publish and export progress

You should now be ready to export your project by pressing the Publish button. The name of each file that is being FTP'd will be displayed in an Export Progress dialog. Any  errors indicates that for some reason, such as a lost connection, a read protected file or a write protected remote directory, the file was not transferred.

If there were errors, check the Export Progress log to see exactly what they were. With that information, you will be better placed to solve the problem. You can right-click the body of the Export Progress log, use "Select All" from the context menu to select all the text -- then use the standard Windows Copy/Paste keyboard shortcuts to paste it elsewhere for easier study.

A successful upload should always end with: "Transfer completed without errors!"


If you browse your Destination Directory again, you should see that your files have appeared in that folder.


Transfer completed without errors
FTP Server Directory
Project published!
Why can't I browse my site?

First, make sure you are connected to the internet! Other problem areas are:

Firewall
The most common reason for failure is that you have a firewall (or a program like "Net Nanny") turned on that is blocking the transfer. In that case, you must set the firewall to allow SiteSpinner to access the Internet.

If the firewall is causing the problem you may see
 
Preparing to Connect ...
and then nothing further. Sometimes it will also say
  Could Not Connect
and you may see
  The server name or address could not be resolved

FTP error box
Depending on the firewall, SiteSpinner may just wait (hang) until it connects  or it times out -- then you get the "could not be resolved" message

If you are using Windows, you may have the Windows firewall running by default. Also, be sure you are not using a 3rd party firewall and the Windows firewall at the same time. That can cause problems. And don't overlook firewalls on your local network.

If you cannot configure your firewall(s), try turning it or them off completely and then browsing/ publishing. Turn them back on when you are done.


Invalid Host, User Name or Password

If any of your host name, user name or password are incorrect, you will not be able to browse or publish. If you see a "Last Error" of
  The password was not allowed
it could be an incorrect Host, User Name or Password -- since they work as a trio.

FTP error box
The password was not allowed
Of course you should double and treble check that you have all three absolutely correct -- make sure the capitalization exactly matches what your host has given you. If you can, copy and paste from the email your host sent you. Some letters like "o" and "I" can look very like numbers ("0" and "1") -- copy and paste avoids that difficulty.

Sometimes your host has a failure and resets your password to what it was when you first signed up. So try your original password. If in any doubt, tell your host you have lost your password and they will e-mail you the current one.


Invalid Host Name

If you are absolutely confident about login and password, then the only variable is the host name, and unfortunately this is the one hosts are often vague about.

If you get a "could not be resolved" message almost immediately (within 1 second), make sure your user name is allowed to use FTP -- you may be able to check through the Admin function of your site. And make sure you are using the correct FTP address -- it need not be the same as your web address. Check the spelling.

If your domain name is http://www.MyDomain.com. your ftp address may be something like:
ftp.MyDomain.com
ftp://MyDomain.com
ftp://ftp.MyDomain.com

Try each of those variations -- you have nothing to lose. If that does not work, ask your web host to confirm the correct Host Name.


Poor connection
Wi-Fi connections tend to be unreliable for FTP -- there is a high rate of frame dropouts. Or you might have a bad landline. Either of these could cause upload problems through timeouts or too many retries. You may have some luck setting the retries value higher -- also try switching between active and passive modes. You might have better luck at another time of the day, when sources of electrical interference are reduced.


Try to connect another way
Try to log on to your site via the Windows FTP or some other FTP program. If you can, it is at least confirmation of your login details. You may instead choose the "other way" to upload, and instead use SiteSpinner only for the publish to disk.


Why can't I publish to my web host?

If you can't publish, the first step is to see if you can browse your site as described above. If that works, there are still several reasons why SiteSpinner might be able to browse but not publish:

Check the obvious first. Make sure you have the Profile tab set to an Export Destination of My Web Host(FTP).

On the Pages tab, double check the pages you are asking to publish.  If you are actually  publishing only a single page when you mean to publish "All", you may think your publish is doing nothing. Check your Export log to see what html files SiteSpinner is actually publishing.

You may be trying to publish to the wrong part (folder) of your site. If you do not know the correct part, try leaving the Remote Publish Directory as a forward slash,  / Then allow SiteSpinner to set the directory by browsing your site.

You may have used up your allocated disk space on your host.

If you are experiencing an unreliable connection that seems to work partially, you may be using a connection that requires "Passive Mode" FTP. To correct this, select the Use Passive Mode check-box on the FTP tab of the Publisher window.

You may have a file open in some other program, such as an image editor or viewer program.

Look closely at all the error messages in your Export log. Even though they seem cryptic, there may be some clues there. Are there any patterns in the files that are producing the errors? Look at the locations where the files are going -- if wrong, you need to correctly set your Remote Publish Directory by browsing your site.

Put auto backup off -- sometimes hosts will not accept . ims project files. If the ims project file is the only one showing errors in your Export log, this is the probable reason.


Try to publish another way

If none of the above helps, try publishing to a local directory using the "Files on Disk" Export Option. If you can do that without problems, a workaround may be to:
  1. publish locally; and
  2. open a 3rd party FTP program (There are many free ones available on the Web, and there is also one built into Windows); and
  3. upload the published files from your local directory to your web server.
See also
Windows FTP Tutorial
Publishing Questions FAQ