A table provides a convenient means to group, position and align objects horizontally and vertically. The Table Editor supports most table operations including spacing, padding, borders, column spans, row spans and titles. You can also apply color and alignment to the entire table or to individual cells.
Before getting heavily involved in tables, make sure you really need them. Once upon a time, tables were necessary for page layout. However, SiteSpinner with CSS (Cascading Style Sheets) has a better alternative -- just drag and drop objects onto your workpage and let SiteSpinner worry about all the positioning details. But tables do have their uses still.
So assuming you really do want a table, here we go ...
Create a table
Create a new table by selecting the Blue Grid button on the Tools toolbar at the left or from the Object menu. Since the Table Editor is fairly large, you may wish to move the editor or this text in order to follow the instructions.
With the table button selected, click anywhere on the workpage to place your table
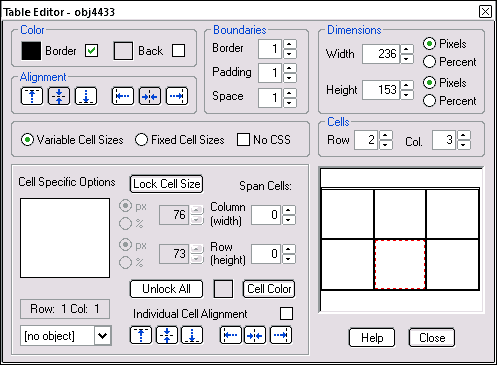
Drag one of the corners of the table to make it a bit larger. You should now have a square, four-cell table. Double-click the table to open the Table Editor
Change the number of cells any time by altering the Rows and Columns in the Cells section of the Table Editor
Adjust the cells to create 2 horizontal rows and 3 vertical columns -- you should have 6 cells -- 2 across and 3 down.
...
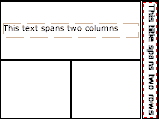
Close the Table Editor and select the Text Editor to create a new text object. Enter the following text: "This text spans 2 columns". Click Save and Close to exit the Text editor
Now drag your text object and place it into the top left table cell
Double-click your table to open the Table Editor, select the top left table cell in the preview pane and increase the Span Cells: Column to 1. Close the Table Editor
Open the Title Editor and enter the following title: "This title spans two rows". Exit the Title Editor. Drag your title into the second (right hand) cell of the first row
Select the Quick Editor > Object tab. It should display the title in the selected cell. If it doesn't, click the table cell that has the title
With the title object selected, enter a rotation of 90 (degrees) in the Quick Editor Rotate box. This will rotate the title within the cell
Double-click the table to open the Table Editor, select the cell with the title in it and increase the Span Cells: Row to 1.
Your table and Table Editor should look something like these:
This text spans two columns
...
Under Dimensions, set the Width to 100 and click the Percent radio button. Your table will now fill the full width of your page -- 100%
Set a background color for the whole table. Top left -- check the Back box and select a color
Set borders for the whole table in the same way -- this time the Border box
Experiment with the Boundaries values too, to get something you like.
...
Set a cell to a different color to the general background. Click a cell, then the Cell Color button and make your choice. This will override the general background color for that particular cell
Close the Table Editor
Use the Align tools (bottom tool-bar) to make your table flush with the left edge of your workpage
Your table should now be similar to the finished example below
Double-click either table to make any adjustments
Preview your page. Resize your browser window (drag the right hand edge in and out) and note how the table dynamically scales to fit it.
This text spans two columns
Hot table tips
To add more than one object to a cell, make a permanent group out of the objects first. Buttons to do this are on the bottom toolbar.
To edit the contents of a cell, right-click the cell and select the appropriate edit function (e.g., Edit Text, Edit Geometry).
To keep an object from breaking free from a table when you're clicking and dragging to move the table, hold the Alt key while you drag. Similarly, to keep an object from becoming part of a table when you are moving it on the page, press and hold the Alt key while you are dragging it.
To edit an object in a table cell, double-click the thumbnail of the object as it appears in the table. This opens the correct editor for the object concerned.
To move an object between cells, drag the thumbnail of the object to the new thumbnail cell. (In the pane at the bottom right of the table.)
If you are trying to drop an object into a small table cell, and it won't accept the drop, turn snap grid off (or move the table slightly).
Use the Table Editor Help button for more detailed instructions on individual operations.
Table uses
When it comes to tables, simplicity is a virtue. Complicated tables lead to complicated problems! If you find yourself in this situation, step back and reconsider. You don't need tables for page layout -- perhaps you don't need tables at all? Or, perhaps you could split your data up into two or more simpler tables?
Tables are particularly useful and economical where you have a lot of fairly simple but repetitive data. You can have up to 99 rows and 99 columns which allows for a lot of repetition! Following are three practical uses for tables:
Rectangle
Ellipse
Curve
Tables for lists
Tables are useful for collections of similar objects. Here, each table cell has either an image or a text object. The images and text could have links on them, but here they don't.
Tables for navigation
Below are a few treatments you can give your navigation tables. The text is individual text objects, centered and scaled down to y=0.8, each with a link. Change both the text color and the table background to match your color scheme.
Tables have a built-in range of decorative treatments. Use this to your advantage in photo galleries.
Lake (14K)
The first image is a thumbnail of a popup. The second is the same thumbnail and link but with a text caption added. Two objects. You can have only one object in a table cell but that object may be a group. So make a permanent group of the pair and place the group in the table cell.
If you find the popup link stops working in the table cell, set re-render off and anti-alias off for the group after you place it in the table. (Quick Editor > Object tab.) The default state for a group in a table is for re-render on -- meaning SiteSpinner creates a new image of thumbnail and caption. In this case even without the link, we don't want re-render -- a jpg image and text caption, don't go together well re-rendered as a jpg, the most efficient format for photos.
Once you set re-render off for the first group, the table will reuse that same setting for any subsequent groups.
Tables from other programs
If you create a table in a word processor or spreadsheet there is no easy way to transcribe the data into a SiteSpinner table as described above. The best option is to have the other program export its output as HTML or as a "webpage".
The easiest way is to then use the output page in a i-frame.
If you like to fiddle with code, another way is to use the table code as a Code Object. Identify the code between the <TABLE> and </TABLE> HTML tags of the output file. Copy that code, including the TABLE tags into the code object. You may need to locate formatting code too (perhaps CSS) and add that as well -- but we'll leave that as "an exercise for the reader"!