Form Mail Scripts
Form mail scripts live on your server and do something useful with form data when your visitor sends it. These scripts have several names, FormMail, Mailto and form mail, but we'll go with the most common one: form mail.
In this tutorial we'll cover:
Create a simple PHP script file
Upload the script file to your host
Test the script file
Check if your web host is set up to handle your script
Competition entry -- a simple form mail example
Subscribe to a newsletter -- a slightly more complex form mail example
Other form mail scripts
If you have a valid URL (Action) set for your form, when your visitor clicks Submit, Go, Send or whatever, the browser packages the form data and sends to your host. The URL it sends to will be the URL of the script file on your host.
A simple form mail script will simply send the form data to a particular e-mail address without changing it. This will be good enough for many purposes. Unfortunately hosts are very variable in what they will allow -- there can be security issues with mailto scripts. Therefore in choosing the right script, be guided by the recommendations of your host. Your host may already have a script set up that you can use.
The two essential components for form mail are:
- a form on your page, which you already know how to do -- right? (Because you have gone through Introduction to Forms.)
- a script of some kind to go on your host. For the following example, we've chosen a simple PHP script. No, you don't need to know what the letters stand for! (But if you do, it is "PHP Hypertext Preprocessor".) It is a simple server-side scripting language supported by many hosts, and hopefully yours too. When your visitor requests a page from your site, your server executes any PHP commands in the page. Typically, this may be to access some data on your server and create an HTML page using that data.

Create a simple PHP script file
PHP script files are plain text files. You can include PHP script in your SiteSpinner pages as a code object with a Code Type of "Above All". Or as we do here, add it to your site as a plain text file.
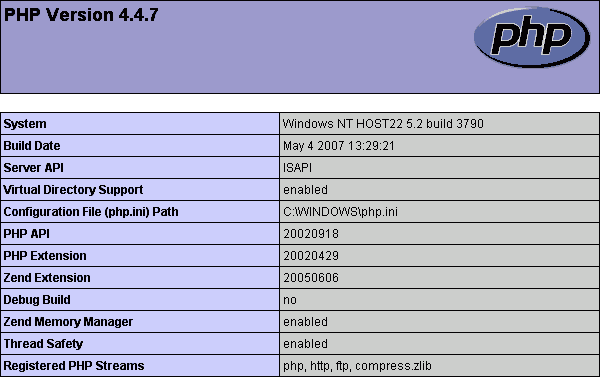
First we need a simple script, and here is one that will tell us all about the PHP capabilities of your host. Even if you don't care about this stuff, we suggest you try it, because the steps you use here to create, upload and test, will be the same as you will use for your real scripts. And it is worth knowing whether your host is set up to handle PHP.
The first and last lines simply tell your server that this is PHP code. The middle line does the work, and asks for the PHP information about your server.
The next step is to turn those three lines of code into a simple, separate text file, named PhpEnv.php. You can use whatever name you like, just make sure you use the file extension ".php". If you have a text editor, like Windows Notepad or better, you can use that -- just make sure you save the file as plain text, or MSDOS text as it is sometimes called, with the .php extension.
We have a text editor built into SiteSpinner, so we'll use that. First, in the workpage view of this page, double click the PHP code above. This should open the code -- which is much like regular text -- in the SiteSpinner Text Editor.
Then in the Text Editor, use the menu File > Save as File... to save the text to a new text file. This should bring up a standard file save dialog which has these interesting bits down the bottom:


Give the file a .php extension and leave the "Save as type" at "Text Files", both as shown. This should create a text file of 25 bytes in the folder of your choosing.
If you are in any doubt about what the PhpEnv.php file should look like, there is one already made in the Tutorials\Media folder.
Upload the script file to your host
The previous steps have created a very simple script file. As this file will not run on your computer, but must run on your host, the next step is to get it to your host. One way is to upload the file to your root directory via a separate FTP program or the one built into Windows.
Another way is to include the script file in your page as an Embedded Object, and use the normal SiteSpinner publish to upload the file. Details are in the Embed File or Media tutorial -- to get the file into the root folder of your site, set a Format (Embed Editor top right) of "Publish File".
Test the script file
Now that the script file is on your host, the next step is to test it. The easiest way is to enter the URL of the file into your browser address bar. The address to use will be like this: http://www.YourDomain.com/PhpEnv.php. For the "YourDomain.com", substitute the actual name of your site, and the actual name of your file if you used something other than "PhpEnv.php".
Another way to test the script file is via an http link. This type of link is very useful for testing because it allow you to preview your pages normally, but use the script already uploaded to your host. Example:
Link type: http://
Link URL: www.YourDomain.com/PhpEnv.php
Another way to test is to include a blank link type to the file on your page. This can be a simple link such as:
Link type: leave blank
Link URL: PhpEnv.php
This is the style we suggest you use for the final version of your project, as the project is then more portable and not tied to any particular URL. For this to work, both the page containing the form and the PHP file must be in the same folder of your site.
Does your host handle PHP?
Your testing above should have produced a page that starts off rather like the one just above. If you see something like this, then pat yourself on the back -- it is set up correctly.
If you don't see this:
- Check that the file you used is exactly like our example
- Check that you have uploaded it to the root folder of your site
- Check that your host has PHP available, and that it is turned on
A simple form mail script (competition)
Now that you know how to build, upload and test a simple script, (and it works!) let's move on. Imagine you are running a competition that requires your visitor to send in their competition entry and their e-mail address.
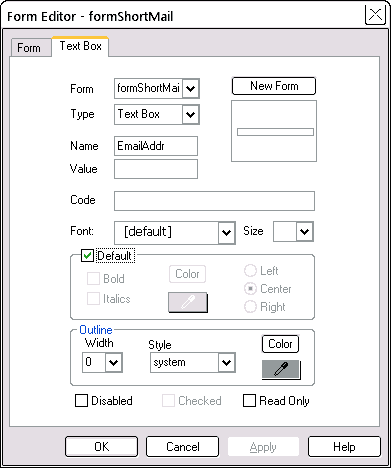
First you need a form. This consists of
- a text box to hold the visitor's e-mail address. Name: EmailAddr
- a text area to hold the competition entry. Name: Entry
- a Submit button. Name: whatever you like!
The URL (Action)
The URL (Action) is the name of your script file -- we have assumed it is called SendMail.php.
As you did for the test above, you could either use the full URL: http://www.YourDomain.com/SendMail.php
This allows you to preview your page, but using the PHP script on your host.
Or just use SendMail.php, making the assumption that the php file will be in the same folder as the html file using it. Because SendMail.php won't run on your computer, you won't be able to preview with this URL (Action).
We suggest while testing your page, you use the full URL (Action), as this allows you to preview. When you are happy that everything works, then substitute the shorter URL (Action). If you forget to do this, no harm done -- the long form of the URL will also still work. But it won't be portable -- if you ever move your site to another domain, you will need to fix the URL (Action) address.
Form object names
Because the PHP script needs to refer to some data from your form, it is useful to give those data fields meaningful names. So we named our text box EmailAddr and text area Entry to reflect their purposes. These names must exactly match the ones we'll use in the PHP script.
Here is our complete form, and underneath, the SendMail PHP script. If you are in any doubt about the way the script should look in the file, there is a copy in the tutorials media folder.
<?php
$ForwardTo="someone@somewhere.com";
$email=$_REQUEST['EmailAddr'];
$entry=$_REQUEST['Entry'];
mail($ForwardTo, "Competition Entry", $entry, "From:$email");
header("Location: ThankYou.html");
?>
The PHP script
The PHP script just above does the following things:
- Sends an e-mail to you with the details of the entry -- this will look just like your visitor sent you the e-mail directly
- Opens a "Thank You" page in your visitor's browser.
To get it working for you, copy the PHP script to a file called SendMail.php.
Modify the line which says: $ForwardTo="someone@somewhere.com"; change the someone@somewhere.com to be your actual e-mail address.
Notice the script contains references to your form fields EmailAddr and Entry. The names in your form must exactly match the names here.
Also you need a "Thank You" page. This is normal html page that you can make like any other page of your project. There's one in this project -- ThankYou.html.
Send the file SendMail.php to the root folder of your site. As described under Upload, you can either
While you are uploading, upload or publish your Thankyou page to your host as well -- it will helpful to have that appear as part of your preliminary test.
Initial test of the form mail script
As for the earlier example, you can test by copying the full URL of the php file on your host into the browser address bar. If this works successfully, you should get a blank e-mail from an "unknown sender" with the heading "Competition Entry". If you have a Thankyou.html page on your site, you should see that displayed too.
If you see those things, you know that:
- The script basically works -- at least no gross errors
- You have uploaded it to the correct part of your site
- Your e-mail address is correct
Possible errors
You get a page-not-found error and no e-mail:
You did not upload the script file, or if you did, not to the correct part of your site.
You get some other error message, which is your server reporting a problem with the script. You may or may not still get an e-mail and a Thankyou page:
You have some error or errors in the script that you need to fix.
You get an e-mail, but a file-not-found error instead of the Thankyou page:
You have not uploaded (published) the Thankyou page, or if you have, it is in the wrong place. It should be in the same folder as the php file, and its name must exactly match the one in the php file.
Everything seems to work but you don't get an e-mail:
Check that you have your correct e-mail address in the php file.
Preview
That basic test will tell you a lot about the state of your php file. Assuming it is OK, you can continue by testing your form page in preview but using the script file on your host.
To do this, temporarily put the full URL of your script file in the URL (Action) field of your form. Something like: http://www.YourDomain.com/SendMail.php. If you don't do this, you will get a "file not found" error when you click "Send Entry". Reason: the form is looking for SendMail.php in your preview folder, which will probably not be there. Don't even be tempted to put SendMail.php in your preview folder -- it won't work anyway!
Preview the project with the full URL (Action). Enter some test details in your form and click "Send Entry". Almost immediately, you should see you Thankyou page appear -- assuming it is on your site. Instead of being blank, your e-mail should now have some useful details. But you may need to do some tweaking to either the form or script -- depending on your results.
One common source of error at this stage is a mismatch between the field names of your form and the field names as they appear in the script. Both should be exactly the same.
<?php
$ForwardTo="someone@somewhere.com";
$email=$_REQUEST['EmailAddr'];
$entry=$_REQUEST['Entry'];
mail($ForwardTo, "Competition Entry", $entry, "From:$email");
header("Location: ThankYou.html");
?>
When you are happy that everything works, revert the URL (Action) to plain SendMail.php (optional) and publish your form page.
Now run it from your site, say by typing the form page URL into your browser address bar. It should work the same as it did in preview.
Subscribe to our newsletter example
A limitation of the simple form mail script above is that you can have only five parameters in the Mail line and we have used them all. As each extra field on the form requires another parameter, you are severely limited in the the number of fields on your form.
To avoid this limitation and so allow bigger forms, we use a modification to the earlier basic script. This time, the form consists of:
- a series of text boxes to hold the visitor's e-mail address, name and address details. These text boxes can be all the same, except for the text box name.
- a Submit button. Name: whatever you like!
These are the names for the text boxes we will use:
- EmailAddr
- Address1
- Address2
- City
- State
- Zip
These names are case sensitive, so make sure that if you modify the form or PHP script, the names in the script exactly match the names of your text boxes on the form.
Subscribe to our Newsletter
Your e-mail address:
Your name:
Address Line 1:
Address Line 2:
City:
State:
Zip:
<?php
$ForwardTo="someone@somewhere.com";
$email=$_REQUEST['EmailAddr'];
$name=$_REQUEST["Name"];
$address1=$_REQUEST["Address1"];
$address2=$_REQUEST["Address2"];
$city=$_REQUEST["City"];
$state=$_REQUEST["State"];
$zip=$_REQUEST["Zip"];
$details='Name: '.$name."\n"
.'Address Line 1: '.$address1."\n"
.'Address Line 2: '.$address2."\n"
.'City: '.$city."\n"
.'State: '.$state."\n"
.'Zip: '.$zip."\n";
mail($ForwardTo,"Subscription Request",$details,"From:$email");
header("Location: Thankyou.html");
?>
The main difference is in the script where all the form field data is joined together to make one large field named $details. This script file (as before, needing you to enter your actual e-mail address) is in the Tutorials/Media folder.
Testing, preview and publish are the same as for the earlier script.
Other form mail scripts
These are very basic scripts -- the "Hello Worlds" of form mail scripts. They do no error checking at all. A practical script should validate form fields as far as possible -- make sure that e-mail addresses have the correct form, make sure there are no empty fields that should be filled out and so on. Good validation can get quite complicated!
Check what your host can offer -- often they will have a form mail script available that you can hook into.
Another source is http://www.webformdesigner.com who provide a free form design utility, and will also host the form mail script for you (for a small charge).
There are many other form mail scripts available on the web. The quality can be variable.
Here is another script, this one written in Perl, and an improved version of one of the most popular form mail scripts ever (from Matt Wright). Before trying it, make sure your host supports Perl: http://nms-cgi.sourceforge.net/scripts.shtml (look for TFMail or Form Mail.)

