SiteSpinner Pro Tutorials banner
< Tutorials Home
Adding Images to Your Pages

See first: Introduction to ImagesIn this tutorial, we cover the following topics:

Loading an image
Re-rendering an image
Image formats
Creating thumbnails (small images)
Popup images
Rotating and skewing an image
Adding transparency to an image
PNG 32 image format
HTML Code Rectangles
Blend Edges
Importing images with transparency
Contrast, brightness and color adjustment
Anti-aliasing (smoothing) images
Watermarks
Images embedded in text


Loading an image

SiteSpinner supports several image file formats including PNG, JPG, GIF and BMP. To use an image on your page, select the Mona Lisa button on the Tools (left) toolbar, or select the Image command in the Object menu. This will open the standard File Open Dialog. Navigate to the folder that holds the image you wish to use, select it and click Open. The image will be displayed at its full size in the center of your screen.

Let's do an actual example:
  1. Select the Mona Lisa button or press Ctrl+I to start the File Open Dialog
  2. Navigate to the /ClipArt/ directory where you installed SiteSpinner
  3. Select the file "Arrowside-1.gif". You should see a red arrow in the preview pane. Click Open to load the image
  4. The arrow will be positioned at the center of the workpage. Use your mouse to move the arrow to any location on the screen. If you wish, you can also stretch the image on the X and Y axes with your mouse. (Drag an edge.)

Re-rendering an image
SiteSpinner can either use the original image that you have just loaded or it can re-render it (create a new image file) to provide numerous additional features. When you re-render an image, you can do the following:
SiteSpinner Pro logo
Image Editor button
Large arrow
Image Formats

When SiteSpinner creates images it can do so in a number of image formats. Set the default type of image that SiteSpinner creates from the Project Options > General Tab -- we suggest you set it to suit the kind of image that SiteSpinner most often creates for your project. Use JPG for photos and PNG 8 or PNG for anything else.
Project Target Options
PNG is the default setting. It is actually PNG 24 which means that it provides 24-bit color in three color channels, Red, Blue and Green with each having 256 levels of brightness. It gives good results for all image types, but can result in large image file sizes -- particularly for photos.

PNG 8
operates on a palette restricted to 256 discrete colors -- which can be any of the PNG colors. It usually gives the best results for the smallest file size. We used PNG 8 for many of the images in these tutorials. If in preview, you see color banding like that just showing below, that is an indication that you need more than 256 colors -- select another format.


PNG 32
supports 256 levels of transparency. Because the file size of PNG 32 is larger than for the other PNG types. We suggest you don't set that format as your project default. Rather, set PNG 8 or PNG as the project default and use the Geometry Editor > Options tab settings to change the format for particular images. PNG 32 example.

GIF
is an older image format, again 256 colors, comparable to PNG 8. Generally, PNG 8 is superior, but there are some types of image, particularly small ones with just a few colors, where GIF will give a smaller file size. GIF is the only image format that supports animation.

JPG
format is best for photos, but also gives good results for other images involving text and lines at higher quality settings. If you reduce the quality setting too much. your image will take on a spotty appearance around the edges. We did the example Title on the left at 20% quality -- too low.

BMP
Don't use BMP format without special reason. It gives excellent results, but with a very large file size.


Use Picture's Format
. Where you are creating, say, thumbnails from source images, the thumbnails will be the same types as the source. If your photos are JPG, the thumbnails will be JPG. If your other source images are GIF, your processed images will also be GIF. We suggest you check this box.

Include Background
. For non-transparent images it can be useful to include
the background in a re-rendered image.

Blend Edges
. Demonstrated in Blend Edges

Size (JPG only)
This is also an image quality reduction. Reducing the quality of the JPG image will reduce the file size of the image -- always desirable on a web page. Reduce this setting to a point just enough to keep your image quality acceptable. At this point the image file size will be as small as you can reasonably make it.

Apply to all Objects
Click this button to have SiteSpinner apply the current image format to all objects that already exist in your project.

Overriding for individual images
To change an individual re-rendered image from the default set here:
png 8 sample
PNG 8
PNG
png (24) sample
Shaded title
Geometry Editor button
Creating thumbnails (small images)

A thumbnail is scaled down version of a larger image. The idea behind this is that the thumbnails, being small, will load a lot more quickly than the larger images. The intention is to download the large images only to those visitors who click on the thumbnails. So the page is faster for everybody else.

Here's how to make a thumbnail from a full-sized image:
  1. If the Quick Editor is not visible, click the Quick Editor button on the tools toolbar to the left (or press Ctrl+Q)
  2. Select the the arrow that you loaded earlier by clicking on it
  3. Select the Object tab of the Quick Editor. Make sure that Re-Render is checked - this will cause the new image file to hold the image at whatever size you change it to
  4. Scale the image smaller by dragging the edges
  5. If you hold the Ctrl key as you drag, the image will keep its proportions
  6. If you have difficulty dragging to the exact size you want, turn Snap Grid off
  7. You can also enter new scale values into the Quick Editor.
Quick Editor button
Snap grid on/off
Scaling an arrow
Small arrow
Preview current page
Preview with the single > preview button, or by pressing the F7 function key. The image of the arrow will be re-rendered at the smaller size. When you publish, this smaller image will be transferred to your web site.

A series of these small images can form the basis of a thumbnail gallery. Now let's look at creating a link to the full-sized version of the image.


Popup images

Let's start with an actual larger photo of the sort you might include in an image gallery.
First make the thumbnail as before (this image is also in the ClipArt folder, and is called "Lake.jpg").


Lake popup
Click me >
Popup box checked
Quick Editor button
To create a link from the thumbnail to the original image, go to the Quick Editor > Link tab. Check the Pop-up full sized image check box. The image above shows this. There is a similar option on the right-click context menu.

Now preview and click the thumbnail image. The original image will open in a new popup window. If you use the Gather option when you publish, the original image will be uploaded to your site automatically (along with the thumbnail which will be uploaded anyway).

When you are using a series of images for a gallery, you can select multiple images from the File Open Dialog by using the the Shift and Ctrl keys:
With the full-size images stacked on your workpage, select all of them with a marquee selection. Now you can scale all at once by dragging, or by entering scale values into the Quick Editor > Object tab.

JPG format is by far the best choice for photos. Likewise, thumbnails of photos also work best in JPG format. By contrast, line drawings and text may well be better in PNG or GIF. Set up the project image formats to take care of your most common re-rendered image.

See also: Tables for photo galleries.


Preview current page
Small arrow
Rotating and skewing an image

The Manipulation tutorial discusses rotating. Here, we look at other ways to rotate -- but first a little preparation:
Rotate an image
Rotate and skew tool
Rotating an arrow
Skew an image


Adding transparency to an image

You can make an image appear transparent by adding shading. It is not really transparent -- it is just the background as at preview or publish showing through. Try this test:
Rotate and skew tool
Snap grid on/off
Original image: leaves
Setting transparency
Quick Editor button
Pseudo transparent image
Don't place a "transparent" object over a text object since it can produce misalignments when publishing -- you can't guarantee the exact location where text, after the first character, will appear on your published page. Title objects are OK, creating fixed image files, but in text objects, text size and font are very much under the control of your visitor's browser.

PNG 32 image format is the one exception to all this -- you can use it anywhere -- covered further below.

The two images on the left are clones of each other, in PNG format, and use the same image file. One is placed on top of the text, and looks fine on the workpage although in preview or published form the misalignment may be showing -- depending on your browser. The one in the margin is an exact replica of the one in the text. In preview, you can drag both of those "transparent" objects with your mouse, and confirm that the transparency is faked -- they are "transparent" only while in a particular place.

SiteSpinner supports four image formats that can be truly transparent:
Below are some examples of fully transparent rectangles. The last one, JPG, is not transparent, but we include that for comparison. In preview, drag them with your mouse to confirm the transparency, or lack of it:


      GIF                   PNG 8                    PNG                   PNG 32                   JPG
Pseudo transparent image
Secret door
GIF format transparency
PNG 8 format transparency
PNG format transparency
PNG 32 format transparency
These have a two-pixel non-transparent border, just so you can see where they are. You can easily remove the borders via the Quick Editor > Outline tab > and setting the Thick(ness) to 0.

Another interesting property of these rectangles is that they can carry a Link or an "alt tag" -- called a "Title" in the link editor. We have added titles to the rectangles here. These rectangles can be useful when making buttons --  you can have an invisible layer on top of a button that carries the link. Or maybe make a secret door to another page -- there's one near here on this page  -- can you find it?


PNG 32 image format
PNG 32 supports 256 levels of transparency. We showed a PNG 32 rectangle above with a fully transparent body. Here is another using the graduations of transparency. It looks similar to the transparencies just above, but the big difference is when the image shifts over its background. In preview, try dragging the image.


PNG 32 transparency
PNG 32
Code
HTML Code Rectangles

There is another category of transparent rectangle that your browser can build entirely out of HTML code. This means compared to other rectangles, no image file is required. To make such rectangles, use the Quick Editor > Object tab to set Anti-Alias and Re-render both off. This forces SiteSpinner, if it can, to do without an image file.

However the disadvantages of code rectangles are:
Blend Edges

Transparency does not always give perfect results. When you specify anti-alias, and also no background, SiteSpinner anti-aliases the image against the page background color which is usually white. Under these conditions, may see a white halo around the image when you place it against a new darker background.

Sometimes you may like this effect, but if you don't, try the Blend Edges option in the Geometry Editor > Options tab.  SiteSpinner will then anti-alias the edge against the actual background of the image as it appears on your workpage.

In preview for the images below, this change has an obvious effect where the white halo on the left-hand rectangle without Blended Edges is missing from the right-hand rectangle.

Tool: Geometry Editor
Blend Edges off
Blend Edges on
Blend Edges off                                Blend Edges on
Importing images with transparency

If you drag a image file that contains true transparency (PNG 8 or GIF) into SiteSpinner, the transparency will be maintained in the workpage.

If you copy and paste (or select and drag) from an image editing program, the transparency will probably be lost, because Windows sends images to and from the Windows clipboard as bitmaps, which don't allow transparency.

Use transparency mapping to make a color transparent after importing.
Original image: leaves
Contrast, brightness and color adjustment

To change contrast, brightness and color levels of an image:
Setting color
Quick Editor button
If you don't see the changes applying to your workpage, in the Quick Editor > Object tab, check the checkbox High Render work window. (This setting does not affect your previewed or published page.)

Changes are applied only to a re-rendered version of the image. The original image is not affected.


Anti-aliasing (smoothing) images

A rotated or skewed image may display significant aliasing (jagged edges) depending upon the angle you rotate it to. Minimize this by enabling Anti-Alias. You can see the effect of anti-aliasing in the workpage if the High Render option is enabled, but this may cause screen updates to appear sluggish with a complex project or a slow computer. Anti-aliasing cannot repair an image that already displays aliasing.
See also: 
Rendering tutorial: Anti-alias
Anti-alias with titles
Tutorials banner
Original image: leaves
Large arrow
Watermarks

A watermark is a pale image placed on a page as a background. You can make any image  paler by putting it on a white background and setting transparency.


Scaled logo
SiteSpinner logo
Because they are so pale, these images will withstand a modest degree of scaling up before noticeable deterioration in quality. The image on the left is the source image for the watermark on the right. You'll find it in the ClipArt folder.

Images embedded in text

Occasionally you may want to embed images in text and have text flow around them on the finished page. Useful for smileys like this smile


<img src='image/smile.gif' alt='smile'>
Text Editor: Options and Filters
Blank
To embed an image in text, insert the code line just above as normal text. Specify your image source (folder and file name) with single inverted commas. The alt attribute is optional, but we recommend that you put it in.

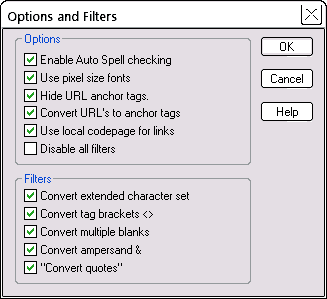
While still in the Text Editor under Options > Options and Filters ...,  uncheck this filter:
  Convert tag brackets <>


Our code assumes the image is the image folder of your site. If instead you will put the image in your root folder of your site, you can simplify the code to this:
<img src='smile.gif' alt='smile'>

In order for this to work in preview, you need the image to be in your preview folder, or in an image folder of your preview folder. See Adding Files to the preview folder.

To get the image into your publish folder, you could use an embedded object via Embed File or Media. The way we did it though was to include the image once somewhere in the project as a regular image -- see left. This puts it into the normal /image folder on your site, where the special code can also access it.

The other way is to use a separate FTP program to do the copy.
smile
See also:
Titles tutorial (a title is an image too)
Rendering and Shading tutorial
Transparency with shapes
Drag and Drop example