


The Key Frame Editor can orchestrate a series of such animations. It can control whether one animation starts at the same time as another, starts after another has finished, or overlaps another animation. The Editor will show a list of all the animations on a page and will allow you to easily edit any of them.
Here is a similar animation, except compared to the first, there is no linear movement. There is still a path associated with the animation, (a line to move along) but it is a very small one, Also,we set this animation to start one second after the first animation is finished. Click your browser refresh button to see it.
For a step-by-step guide to producing effects such as these see Key Frame: move and resize images.


Creating a new key frame action
- Select the object that needs the action
- Select the Quick Editor > Action tab and click the Action button (image).
- Select "Key Frame" in the Action Method drop-down list box (image).
Whenever you have assigned a key frame action, and whenever you select the object, the Key Frame Editor will appear. Sometimes it may be a little reluctant to start. If so, click on some other object, or a blank part of the page, then back on the object of interest.
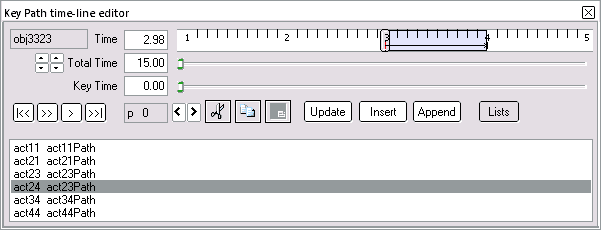
What's in the key frame editor?
The editor has features to edit the frames at each point along the object's path, and can also edit the path itself. The main feature is the timeline along the top of the editor -- this shows the total time for all animations on the page. Set your required total time from the spin edit controls or the Total Time edit box to the left of the time line.
To see the state of the animated objects on your page at any point, drag the slider along the timeline bar to the point of interest. We suggest you drag by the top part of the slider, otherwise you run the risk of accidentally moving a timeline point.
You could also use the Total Time slider immediately under the timeline with the same end results. But notice that the range of the slider is that of the total time. This need not be the case with the timeline slider -- there the visible range may only a part of the total.
On the slider bar you may see a blue section. This indicates the section of the path currently active for editing. If you look in your workpage, you will see the object in the position where it will be at the time indicated by the timeline slider.
The red line, (really part of a little red arrow under the start of the active section) marks the currently active point.
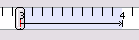
The number of this point shows as "p 0" in the current time line point box (picture). The arrows allow you to step to the previous or next points.
The little dark arrows indicate other currently inactive timeline points.
Drag any timeline point to a new position on the timeline bar, and that will then, if not already, become the currently active point. Similarly, simply clicking on a black arrow will make it active instead. In both cases, the active timeline point shows as red -- that is the one you can edit.
The third slider is the Key Time slider -- use it to move the current timeline point -- the one showing in red. This has the same effect as dragging a timeline point.
You cannot move a timeline point past another. If you try, you will gather up the other point or points and move them together with the active point. This may result in one or more timeline points hidden behind each other.
Use the play buttons to preview the whole animation in the workpage. Hover your mouse over each button to see exactly what each does -- a tool tip should appear for each -- they work much the same as music player controls.
To see tooltip details about the individual controls, in your workpage, open the Key Frame Editor and hover your mouse over the control.


Setting the first key frame
Having created a fresh key frame action, select the object using the action -- if not already selected. The Key Frame Editor should open.
Move the Key Time slider to the time point where the animation is to start. Zero time is when the page is first opened or refreshed. To delay the animation after page open, move the Key Time slider to the right, off the zero time position. This is the point where the first frame starts.
Setting subsequent key frames
Move the object to its next position on the page. Using the Quick Editor, set the size, orientation and color to what you want. You can change the object's position, scale and rotation, the geometry's outline color and width, the shading fill colors, and transparency. You can also change the shading style (solid, linear, cylinder or radial) to be used for the entire path, but you cannot change it for individual key-points.
These are the steps you would have taken with the object before creating a Key Frame action. They are the same steps for second and subsequent points.
Click the Append button. This is your next frame. Notice the little red arrow that indicates this is now the active point. Also, you should see the path line appear in your workpage.
SiteSpinner Pro makes an assumption about the initial position of the point, based on the distance you moved the object -- it tries to keep the object at constant speed. If the time point position is wrong, adjust it by dragging the little red arrow or by sliding the Key Time slider.
Continue with the previous three steps for as many time points as you need. Each set of steps creates another time point.
Advance or return to the next point in the sequence by selecting the time line point forward/back step buttons < >. Or, use the player preview buttons.
Inserting key frames
Inserting a key frame is similar to appending just above, except you use the Insert button instead of the Append.
The insertion point will be the one just before the current active point showing red, so choose the current active point before you start.
Editing key frames
Select the point to be edited. Click on it, or use the foward/back buttons or the play buttons to navigate to it. It should show red.
Using the Quick or other Editor, make the changes to the object's positioning, shape or whatever.
Click the Update button. You may need to then adjust the position of the sill active time line point.
Editing key paths
A key path is a special case of a polygon. Therefore you can use the normal polygon editing procedures. The Vertex Editor on the left toolbar allows you to move points, but normally not add or delete. This is an easy way to adjust paths to be exactly horizontal or vertical, or exactly the same length.
If you want add and delete operations, invoke the secret part of the Vertex Editor via the main menu Object > Show Vertex Editor.
The normal object alignment and sizing tools will work with key paths too.
You can also edit the key path as part of a key frame edit, covered above.


Assigning a key path to more than one object
Assign a key path to multiple objects by assigning the related action to additional objects -- Object Editor > Components tab. With the same action assigned, multiple objects will animate in exactly the same way and at the same time.
It is possible to delay an object tracing a key path, change the direction or change the number of times it will trace the path by assigning a different action but one that uses the same key path:
- Select the object to be assigned the new action
- Create a new key frame action as described above. This will also create a new key path for the action -- that you won't use this time.
- In the Action > Paths > Follow Object Path or Quick Editor > Action tab > Path Object, select an existing key path from the drop-down list box. This will assign the same key path as used by some other action. Later, changing the key path will change it in every action where it is used.
- To add a delay, change the direction of animation or change the number of cycles, use the Action Editor > Timing tab, adjusting the appropriate sliders and check boxes. Setting the speed slider negative will reverse the direction but will not adjust the speed along a key path.
Making the key path visible
The key path is just another object. It can be shaded, scaled, rotated and animated including tracing a key path of its own. Changing the key path will change the animation of objects that trace it. This is a valuable way to create complex hierarchical animation. Don't use recursive animation paths (e.g. Act1 using act2 and that reusing act1.) The results will be unpredictable.
Pixilated images
You may set up an image as we did earlier to zoom in, but end with a very pixilated image like this one below -- in preview, click for the action.


This is an effect you may want occasionally, in which case, do this deliberately:
When you ask SiteSpinner Pro to render (make an image file for a picture, it does so from the image as it is in your workpage. For the action here, we have the image starting very small -- and that how we displayed it in the work-window.
SiteSpinner Pro makes an image file for this very small image, and the DHTML scales it up when the animation runs. The effect you see is what you get when you scale up any small image to make a large one.
There are two solutions to this problem:
If you have a full-size image that you want to display, but have it smaller at some parts of its journey, set Anti-Alias and Re-Render off in the Quick Editor > Action tab. This forces the DHTML to use the large image and scale down from that -- this does not cause a loss of resolution.
Use the Key Frame Editor to position the object in your workpage in the actual size you want the image file. For an animation like this one, set the workpage to show the image at full size. Where SiteSpinner Pro creates the images, like titles, you cannot turn re-render off -- therefore you need to pay attention to the workpage size.
Some rules of thumb:
- If you have ready-built images, put Anti-Alias and Re-render off.
- If SiteSpinner Pro is creating the image, set Re-Render on (and Anti-Alias too if you want.) Then set the Key Frame Editor to display the image on your workpage at its full size.
Another example -- Welcome to my Website
You might want some kind of animated title -- here is one way of doing it with key frames. In preview, click for the action.