SiteSpinner Pro Tutorials banner
< Tutorials Home
Links (or hyperlinks)

A link (short for hyperlink) is a special object, text or image, that you click to go to another webpage. This page does not have to be on your site -- it could be to any site anywhere.

In this tutorial we cover the following topics:

Link attributes
Link editors
Link types summary
Page links in the Text Editor
Assign a title (to the link)
Code -- Link Editor Code field
Link underline and color
Page links in the Quick Editor
Http links (to a website)
Blank links
Relative URLs -- making your site portable
Blank links to image files
File links
Mailto links
Access key links
Links in the Object Editor
Page Editor Links tab
Link colors
Redirect to New Location
Managing your links
Problems with links


Link attributes

Here is a typical link: Go to the index page of these tutorials.

Usually text links are underlined in blue like this one, but you can use other colors. You can also place links on images. Links often point to other html pages but they can also point to images, or other files like .PDF files.

In preview, notice what happens when you hover your mouse over a working link. The cursor changes, usually to a hand with pointing finger, and the browser displays the link URL (the location the link points to) on the status bar, if enabled, at the bottom of your browser. In this case, it also displays a little tip, a tooltip, as you hover over the link.

Preview this page, and look for these features on the two links above. If you click a link, use the back button on your browser to return to this page.

If you have a text object, like this one, open in the Text Editor, hovering your mouse over a link will display the link details in the Text Editor status bar at the bottom.


SiteSpinner Pro logo
Hand cursor
Preview current page
Preview all pages
Link editors

There are several Link Editors available:
The image below shows the Quick Editor opened to display the drop-down list of link types available, and with the [ Page ] link type selected.
Text Editor link buttonon
Quick Editor button
Object Editor button
Page Editor button
Behavior Editor button
Page link
Link types
Link types summary

The Link Editors can create several different types of links including these that we discuss in this tutorial -- most common ones first:

Page links
: Allow you to select a link to a page in your current project. Apart from being easy to use, a page link will keep track of the name of the page. If for example, you create a lot of links to a particular page and then decide at a later time to change the name of the page, SiteSpinner will automatically update the links to use the new name. Page links help avoid errors.
 
Http links
: The standard link to a website. This will be usually some other website, not your current one. If it is your current one, consider using a page or blank link type instead.

Blank links
: First on the Link Type drop-down list, blank links allow you to link to a page in another project, not necessarily the current one, a file or a bookmark.

Mailto links
: Open the visitor's e-mail program with the recipient's address already filled out. Perhaps with the e-mail subject line filled out too.

File links
: A link to another file on your site. This might be a link to a page made with some other tool like a photo album builder, or a link to a file, like a .PDF file. Don't use for HTML pages built with a VM product -- you are safer using a normal and separate publish for those other pages.


Text Editor button
Page links in the Text Editor

Here is how to set up a simple page link to the index page of these tutorials:
Making a page link in the Text Editor
Link Type
Select the link type from the drop-down list box at the top left of the Link Editor (click on the down arrow and select [ page ] from the choices available

URL to link to
Select the URL from the drop-down list box near the top right of the Link Editor (again, click on the down arrow). This will display a drop-down list of all the pages available in the project. Select the one you want to link to. In this example it is index.

Don't type anything in the Link Type or Link URL fields -- to make an entry is just a click, select and click operation.

Text link to click on
The next field down is the text the link is on. It is a replica of the highlighted text in the editor. You can edit the text here, and the change will appear in the Text Editor when you click OK.


Assign a title (to the link)
The next field is optional for text links. Use it only if there is some extra information your visitor should know before clicking on the link itself. The title text will show in preview when you hover your mouse over the link text.

Note: this operation has nothing to do with the Title Editor which is quite different.


Code -- Link Editor Code field
Here enter any code you want to have associated with the link. You may want to display a page in a particular i-frame, or run some special code when the visitor mouses over the link. Enter the code to do that here. For most uses, you can leave this field blank, but when you do need it, it's very useful.


Link underline and color
if you want a link to look different to the default set in the Page Editor > Links, Fonts tab, use these checkboxes:
A common use for this feature is in buttons, where you may want your button text links to look different to other links.

Finally, click the OK button to close the Link Editor.

Page links are the best to use. You avoid typos, and if you ever change a page name, SiteSpinner automatically updates all your page links.

Try a page link here by making your own link to the HelloWorld page. When you have made it, preview this page. One reason it might not work is if the HelloWorld page does not exist in your preview folder. Ensure this by one of these actions:
Here is another example of a page link, this time to the Text tutorial.


Page Editor button
Preview current page
Preview all pages
Page links in the Quick Editor

You can make page links using the Quick Editor in similar fashion to the Text Editor.

When you make a link on a text object in the Quick Editor, it applies to the whole text object. So it pays to use this kind of link only on short text objects. Contrast with a link made in the Text Editor, where it applies to as much or as little of the text as you want.

If you find a lot of text on your page underlined, it may be because you have accidentally made a link on the text object.

Making a page link in the Quick Editor
Link to Home page
Home
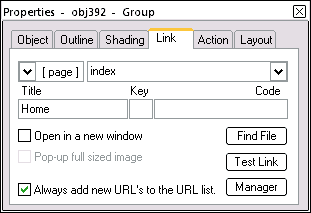
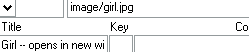
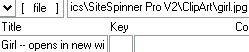
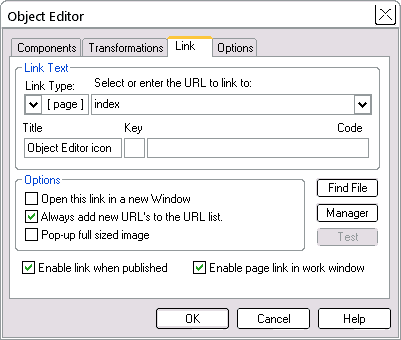
Above are two links each going to the index page of this project. The top one is a link applied to a text object, while the  bottom one is a link applied to an image. We made this image with SiteSpinner, but you could use the same kind of link on any image. The image on the right shows the Quick Editor > Link tab for the image. Notice how this link has a title. In preview, hover your mouse over the image, and you should see the little popup tooltip.

It is recommended practice to include a short title with links on images -- this gives your  visitor some idea of what the image is about, even if it does not show in their browser.  Should the image be missing, it will also show in place of the image -- the title will appear in the HTML code as an "alt tag" (alternate text).


Http links (to a website)

A link to another web site is somewhat different to a page link:
There are two examples below. You could make the first text link example equally well in the Text Editor.  For the second, because it is an image, you cannot use the Text Editor. The image on the right is the Quick Editor view of a link on an image.
Http type link
Making an http link in the Quick Editor
www.VirtualMechanics.com
Virtual Mechanics logo
Blank links

A blank link type allows you to:
Use this link type when you will be uploading the files to your site by some other means -- e.g. publishing another project, or using a separate FTP program. SiteSpinner will not upload any files you refer to in blank link types. If you would like SiteSpinner to do the upload, either:
If you are trying to make a page link, and you don't see a page listed in the drop-down page list, it means that page is not part of your current project. If you have only one page in the current project, there will be only one file in the list -- the current one. It will hardly be a list at all. If this is a mistake, and your project should have the other pages, you can join them in with the main menu File > Append Project...

Partial page list
Partial page list of a project
Single page project
Full page list of a single page project
Even with a single-page project, you can still link to a page in another project on the same website, but this time you need to use a blank link type.

Suppose the index page is part of another project. In this case, you can't use a page link, because the page would not appear in the page list (the page list shows only pages in the current project). Here are the same objects that we used for a page link but this time with a blank link type:
Link type: leave blank
Link URL : index.html
This time you do have to type in the Link URL field, and you must also include the file extension -- in this case .html


Link to page in another project
Link to Home page
Home
The end result of a link like this is the same as a page link -- except a little more work with more possibility for error.


Relative URLs -- making your site portable

If you are linking to other files on your site, in different folders, you can extend the idea of blank links. The usual way SiteSpinner works is to keep all published links relative to the root folder of your site, where the html files are. This means you can move the whole published project to another location, and it will still work.

Consider a photo referenced in an HTML page like this (absolute URL):
http://www.YourDomain.com/image/MyPhoto.jpg

That page and photo will work on your site, but if you want to view the same website offline on your local hard disk, or move your website to another domain, you won't see the image. The path to YourDomain is not available in those cases -- and that is the only place that image link will work.

Consider a photo referenced in an html page like this (relative URL):
image/MyPhoto.jpg

That will work anywhere. The link is saying "go to the nearby image folder and show MyPhoto.jpg". The only requirement is that the image folder and contents must accompany the html page wherever you place it.

In general, to go to a file in a lower level folder, as we did for 
MyPhoto.jpg, use a Link URL like this:
Link URL:
lowerFolder/index.html  or
Link URL:
./lowerFolder/index.html
Those two URLs are equivalent (but the first one is more efficient by two bytes). The single dot as in ./ means work from the current folder.

To go to a link in a higher level folder, one level up, use use a link URL like this:
Link URL:
../index.html
To go to a link in a different folder at the same level, use use a link URL like this:
Link URL:
../sameLevelFolder/index.html
The double dot as in ../ means go one folder up.

The bottom line is: where you have a choice, use relative URLs. They are not only much shorter, but they are also more flexible.


Blank links to image files

You can link to any kind of file using a blank link type. Here it is applied to an image. Notice two things:
Blank link type
Link to page in another project
Girl -- opens in new window
Checked
Click for larger image (18K) in a new window
SiteSpinner does not change the link in any way when it publishes, and as mentioned before, does not upload any files involved. The link says that the image is in the /image  folder. Therefore to use a link like this, you need to copy the image, "girl.jpg" from wherever it is stored folder to these two places:
File links

The file link type has the same end result as the blank link type.  Both are a link to another file on your site. This might be a link to a page made with some other tool like a photo album builder, or a link to an image or file like a .pdf file. Don't use File links for HTML pages built with a VM product. You are safer using a normal and, if necessary, separate publish for those other pages. In that case, use either a Page Link type or Blank link type instead.

The advantage of using a file link over a blank link is that you don't need to mess around with the preview folder contents in order to preview properly. The source file can be anywhere on your disk, and SiteSpinner will find and use it. Also if you publish with the gather option, SiteSpinner will gather the file and upload it to your site. Much easier.

Where does SiteSpinner gather to?  A file is an "External File" -- see Publisher Sub Folders. By default, SiteSpinner will place the file in the root folder of your publish directory -- however, you can change that with the "External Files" setting.

You can type in the disk location for a file in the URL field of the Quick Editor > Links Tab, but the file path can be long and the possibility for error is high. For this reason, always use the Find File button to browse for and select the file.

Below is an image with a file link, and the Quick Editor Link tab settings to achieve that.


Quick Editor Liink: file
Checked
Quick Editor File link
Girl -- opens in new window
Click for larger image (18K) in a new window
Mailto links

If a visitor clicks a "mailto" link on your page, that should open their e-mail program with the address already filled out, and ready for them to enter some text. You can also fill out the subject in advance. No e-mail is actually sent until they click the e-mail program "Send" button.
 
An e-mail link is similar to the other links:
Link type: mailto://
Link URL: someone@somewhere.com

Change the URL to be the e-mail address of your intended recipient. This will often be you yourself -- you want your visitor to send you an e-mail. So just put your own e-mail address there. Test the whole process by sending an e-mail to yourself.

A URL like the above will leave a blank subject line in the e-mail. If you don't want this, enter a link URL like this:
Link type: mailto://
Link URL: someone@somewhere.com?subject=Website feedback

Again, change the subject line to something appropriate for your site.

Below are two fictitious links, one on text, one on an image. Substitute your own e-mail address or that of an understanding friend. You are safe in playing around here -- nothing happens until you click "Send" on your e-mail program. (And of course you won't do that unless you really do want to send something.)


Tutorials banner
Making a mailto link in the Quick Editor
Quick Editor mailto link
E-mail someone (test only)
Access key links

In the Link Editors, there is a field marked marked Key. On browsers that are properly equipped, this allows visitors to press a single defined key to jump to the linked page, so avoiding the need for a mouse. This is particularly useful for mobile browsers.

In Internet Explorer, holding down the Alt key plus the single key will set up the link which you can then accept by pressing Enter. I.E. will display the link in the status bar at the bottom of the browser window.

A disadvantage of access keys is that they can hijack normal browser hot keys. For example, I.E. uses Alt+H for "Help". So if you decided to use "H" to be the Home page access key, the normal Alt+H Help hotkey won't work. Possibly not a disadvantage here since nobody reads the Help anyway!

You can use digits for access keys, and they have the advantage that browsers don't often use them as hot keys.

Unfortunately there is no standardization, and you will need some way to let visitors know that they can use access keys.  Schemes can include highlighting the access key in various ways, or perhaps using the first letter of the page name as the access key.

To set a an access key link, enter a single letter or digit into the Key box of a Link Editor. The example below uses an "I" for "Index".
Settin an access key link
< Tutorials Home
Setting an access key
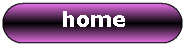
The Tutorials Home link links to the index page of these tutorials and has an "I" access key like the one shown. If your browser is set up to handle it, using the "I" access key in preview or in the on-line version of these tutorials should take you to the index page.

In Internet Explorer, down the Alt key while you press I, then press Enter.
Links in the Object Editor

The Object Editor link tab has the same features as the Quick Editor, plus a little more. In normal use, you will find the Quick Editor more convenient -- but the Object Editor has these two additions:

Enable link when published
: Normally you want links to be enabled. However there may be occasions where you don't want this. For example, while you are developing a site, you may want to put future links in place, but don't want to activate them just yet.

Enable page link in work window: 
Sometimes, as on the index page of these tutorials, you may want to click on a link and open that page as your workpage. This avoids the need to navigate by going through the drop-down page list.

This is a two-edged sword. Below is a link to the index page which works, but try to edit it in workpage view! You can't select it with a normal left mouse click -- you have to right click and then select an edit option from the popup menu.
Object Editor button
Link to index file
Object Editor Link tab -- enabling links
Page Editor Links tab

The Page Editor Links tab has three sections, two of which relate to links:


Page Editor button
Page Editor Links, Fonts tab
Link colors

Define the link colors for either a single page or for your whole project with the Page Editor > Links, Fonts tab. Available link colors are:
You can also turn hover off and select whether links are to be underlined.

By default, all links are underlined. However, you can set links to not be underlined on a particular page. Whichever option you choose, you can override the link underline and color properties of an individual text link in the Text Editor.


Redirect to New Location

This redirects a page to a new page either immediately or after a certain time. Use this when your page, or indeed whole site has moved and you want your visitor to go to another location. And never come back to the redirection page again.

This caters for visitors or search engines who have bookmarked your pages in the past.

Don't use this function thinking that it creates normal links. It doesn't.

If you would like your page to automatically link to another page after a period of time without your visitor having to click a link:
Try redirection below. You will go to a redirection page, which will in turn, after 20 seconds, return you to the top of this page. Go to the Redirection demonstration.

Page Editor button
Managing your links
There is a link manager available on the Manager button in each of the Link Editors.
This allows you to delete and edit old or invalid links. You can Import and Export links for sharing with other applications. The format is that used by Internet Explorer and Firefox for their favorites lists.
Problems with links

When you are testing your project be sure to publish ALL your pages or preview using the "Preview Project" option (the double-page spyglass button). If you don't do that, only new one page will be created and your links will end up pointing at old or non-existent pages.

If your pages are in separate project files you cannot use page links to link them.
To join projects together, use the main menu File > Append Project ...

When you have a link that is misbehaving, try this:

Hover your mouse over the non-working link. The status bar at the bottom of your browser should show you the page or other file that the link points at. If you don't see a status bar, you probably have it turned off.

A missing image displays a little red x in the top left corner of a blank where the image should be. Right click the blank, then examine the image properties to determine what the full URL of the image should be.

For a link to work, you must have a page or file of the exact name in the exact location that the link reports. Either you can fix the link, or place the file at the location the link points at.

Sometimes with links on text objects, you can change the link but nothing seems to happen. It is possible to make the same link in two ways:
The link in the Text Editor takes precedence, so if you are trying to change a link with the Quick or Object Editors, and nothing changes, consider that you might also have a forgotten link also in the Text Editor.

If you see a mass of underlined text in a text object, you may have made an unintentional link using the Quick or Object Editors.

Preview current page
Preview all pages