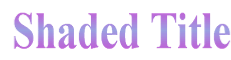
A gradient fill has two endpoints, and the color changes gradually and evenly as you move from one endpoint to the other. Here is a simple example showing a gradient fill of a rectangle:
Gradient fill button operation
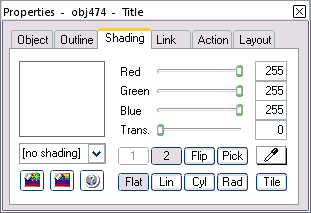
In the Quick Editor > Shading tab are a number of buttons. They have two positions -- on or off. In the "On" state they become darker to show they are selected. "Off" -- they are lighter. This makes more sense if you think of the "On" button as depressed and so in more shadow than an unselected one. (But is the reverse of some other buttons you may have seen.)
Color endpoint buttons
The first two buttons are labeled 1 and 2, for color 1 and color 2, the colors of the two endpoints. The color 1 button will become active when the shading supports 2 colors -- anything other than a flat color.
If they are labelled Cnt (Contrast) and Brt (Brightness), it may be because you may have an image selected -- they don't allow gradient fills. Try selecting instead our "Shaded Title" just above.
To set the endpoint colors, select a button, either 1 or 2, then adjust the sliders for the color to associate with that endpoint.
Fill-type buttons -- Flat, Lin Cyl and Rad
Below the color endpoint buttons, are four more buttons. You can select only one at a time:
Flat flat: A single color as shown in the Quick Editor examples above and below (Color 1 button is inactive)
Lin linear: The color changes from one end to the other
Cyl cylindrical: The color changes from the middle outwards, along the horizontal axis.
Rad radial: The color changes from the center outwards
Flat
Linear
Cylindrical
Radial
Linear
Cylindrical
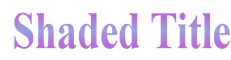
Select the Shaded Title above and try these buttons, while adjusting the color sliders. These are also called RGB sliders, short for for Red, Green, Blue.
The bottom slider, Trans, is used to adjust transparency. Use it to adjust the transparency of either or both colors 1 and 2.
For color adjustment, use the left/right keyboard arrows to nudge the slider, type the values into the adjacent edit box or use the eyedropper.
For linear and cylindrical shading, adding 90.00 or 270.00 degrees of rotation to the object via the Quick Editor > Object tab will change the direction of the graduation -- shown in the examples above.
Other options are 180.00 degrees of rotation to provide a complete reversal of the graduation. This has a similar end result to using the Flip button in the Quick Editor > Shading tab.
The eyedropper that shows in the Shading Editor > Fill Settings tab (and is often grayed out) is a feature that is shared by the Quick and Text editors. To use the color picker eyedropper:
Click on the eyedropper button and drag it to a color anywhere on your screen that you want to copy
While you drag, the background to the eyedropper button will change to the color under the eyedropper
When you drop, the object selected, or any text you type will take on the new color.
Multiple custom colors
The color dialog (e.g. Quick Editor > Shading tab > Pick) is a Windows standard, used in many other programs. It acts the same there too. It is fairly easy to use, but it is not clear how to select more than one custom color.
To set custom colors:
Click the button Define Custom Colors
Click the custom color box you want to change -- it should have a little rectangle around it
In the large color window on the right, click the hue you want
This changes the vertical color band at the far right showing the luminances of that hue
Move the triangular slider to the luminance you want or click in the vertical color band
The box marked Color|Solid should change as you do these steps
Click Add To Custom Colors
The trap is that if the triangular slider is set "no luminance" (slider at its lowest) you can click anywhere in the large color window and nothing seems to happen. Any hue at zero luminance is black!
You can set a sequence of custom colors by looping through the steps 2 to 7. Each Add To click will fill out the next custom color in sequence -- continuing on from the color box selected in Step 2.
More examples of gradient fills
The first two examples also show rotation. The last example is done in the Shading Editor where you can set the origin of radial shading -- the origin does not have to be in the center of the object.
Linear
Cylindrical
Radial
Shading In the Gradient fill section, wediscussed using the controls in the Quick Editor > Shading tab. Make the following changes to the arrow polygon on the left:
Select the Linear Shading button on the Quick Editor > Shading tab
Set Color 1 to Red=155, Green=210, Blue=155
Set Color 2 to Red=155, Green=200, Blue=240
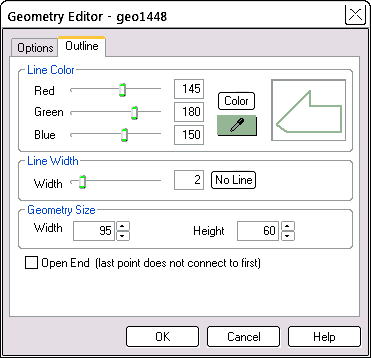
Outlines Select the Geometry Editor > Outline tab. Adjust the Line Width and color:
Set the Width slider to give an outline width of 2
Set the RGB sliders to R=145, G=180, B=150
You could have done this in the Quick Editor too. You should now have an arrow that looks a lot like this:
Transparency
Adding transparency makes an object look transparent by letting some of the background show through:
Click the Transparent Flat Shaded Title above -- it's not really transparent -- yet!
Select the Quick Editor > Shading tab
The title has a color already assigned to it: black
Adjust the Transparency between 0 and 100 to see the effect
Select Linear shading and adjust the color 1 and color 2 transparency settings
Move the title so that it is on top of the blue rectangle to the right.
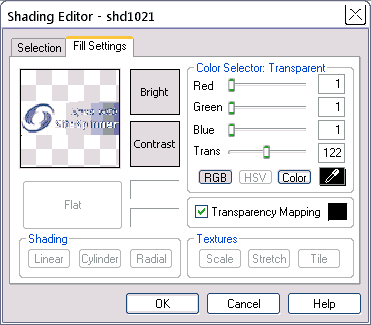
Transparency mapping is similar to transparency except that the transparency is weighted towards a color you define. Transparency mapping allows you to completely "wash out" certain colors, while transparency fades out all colors.
Select the "Spun With" logo at the left
Open open the Shading Editor > Fill Settings tab
Notice the effect of the Transparency slider is the same as in the Quick Editor > Shading tab. See Transparency above. The image appears to fade as more of the background shows through
Check the Transparency Mapping check box to enable transparency mapping
Click the the transparency mapping control to the right of the "Transparency Mapping" label -- a little unmarked box, which may be showing a color
You can now select the starting color for the mapping operation:
...
Notice that the eyedropper control is now enabled. Drag the eyedropper across to the darkest part of the "Spun With" logo, and drop it there
The transparency color should now show near black, and the color sliders should also show that near black is selected
Now increase the Transparency slider and notice as you do so, the blacker parts of the little preview logo are removed, then the less black parts and so on
Restore the blacks by returning the transparency slider to 0
Now repeat the last few steps, but this time setting the eyedropper to white
Unselect transparency mapping by clicking either of the large buttons to the left of the color sliders -- showing Brightness and Contrast in the image above. It's not necessary to do that now, but it is useful to know how to do it
Click OK to exit the Shading Editor, accepting the settings you have made.
Now you can return to the Quick Editor > Shading tab and make all the usual adjustments to colors and standard transparency. Or you could continue using the Shading Editor.
Advanced shading
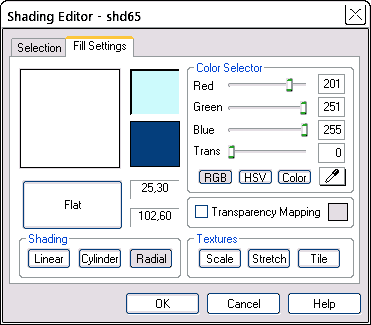
The Gradient fill section covers some features of the Quick Editor > Shading tab. Here we'll look at similar, and more advanced features using the Shading Editor:
Click the rounded rectangle at the left
Select the Shading Editor from the tools toolbar (left -- a picture of paint pouring from a can), or select the same button in the Quick Editor > Shading Tab
Either of those steps should open the Shading Editor
Select the Fill Settings tab
Select the Linear, Cylinder and Radial shading buttons in turn while adjusting the color sliders. Click the two color boxes at the left of the sliders to switch between color 1 and color 2
Select the RGB (Red, Blue Green) or HSV (Hue, Saturation, Value) buttons to set the color sliders to the color model you prefer
Select Radial shading and set the bottom color to dark blue and the top color to a light cyan (about R=200, G=250, B=255)
The large color box contains a shading vector (a line). Use your mouse to move the shading origin (the cross hairs) so that the origin is near the top left corner
Use the other end of the shading vector (a little square) to adjust the rate of change of the Radial shading. It has no effect on Linear and Cylindrical shading
Click OK to accept your changes and exit the Shading Editor.
Linear
Cylindrical
Radial
The Quick Editor > Shading tab has many of these settings too. It does not have the HSV color model, nor can you adjust the origin of the color on gradient fills.
Texture mapping
As we use the term here, texture mapping is the process of copying a pattern (texture) from an image, and using it to color an object.
Any of our usual image files (PNG, PNG 8, PNG 32, GIF, JPG, BMP) can be used as the source of the texture. Apply texture to an object by Scaling, Stretching or Tiling the source image.
A Scaled texture is scaled to find the best fit on the object without distorting the texture. This may leave some areas of the object uncovered -- these will be filled with the background color.
A Stretched texture is stretched to cover the entire object. This may result in the texture being distorted from its original aspect ratio
A Tiled texture is repeated at its actual size until the entire object is covered.
Try texture mapping
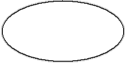
Select the ellipse object to the right
Open the Shading Editor > Fill Settings tab
Select the Scale Texture button to open the standard Open File dialog. Try the file "SpunWithSpinnerPro.gif" from the /ClipArt folder
Adjust the RGB sliders to select the color that will be used wherever the texture does not cover the image
With the ellipse still selected, open the Shading Editor again. Select the Stretch Texture button and load the "SpunWithSpinnerPro.gif" file again
Click OK to exit and view
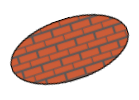
Return to the Shading Editor and select the Tile Texture. Select the file "brick.png"
Click OK to exit and view.
Scaled Texture
Stretched Texture
Tiled Texture
Anti-aliasing (smoothing)
When you have an object that is running diagonally across your screen, you may see jagged edges. This is called aliasing -- if you have a sharp transition between two colors, your computer has to choose one or the other. It is possible to smooth out the transition by adding some extra pixels of intermediate colors around the transition. This is called anti-aliasing,and we're about to do it right now:
Select one of the texture mapped objects above
Select the Quick Editor > Object tab
Make sure the Anti-Alias box is checked. You can see the effect of anti-aliasing in the workpage by checking and un-checking the High Render box
When high render is selected, the workpage may appear sluggish on slower machines. It is OK to work with high render off. It affects only your workpage -- it has no effect when you publish or preview
Turn high render off and rotate the texture mapped object observing the aliasing jaggies. Turn high render on to see the effect of anti-aliasing
The downside of anti-aliasing is that it can make smaller objects look fuzzy. If in doubt, try it both on and off -- pick the one that give the best results.
Also, you are anti-aliasing against a particular background, often white -- you may have problems if you then use the same image against a colored background. Example.
Rendering is the act of drawing objects on your screen. Re-rendering is the act of modifying an object in some way, then drawing it again. In practice, this means that the re-rendered object will require an image file in order to be displayed.
One common application of re-rendering is to make a permanent group of two or more related images, then place re-render on for the group. This produces one larger image file instead of two or more smaller files -- often more economical. The shadowed title at the top of this page has this treatment.
For more complicated shapes as we have been using here, re-rendering on or off makes no difference to the resulting image file -- one is always produced.
However, for straight flat-color or tiled rectangles, if you put Anti-Alias and Re-Render off, no new image file is produced. This has advantages if you want a large image that you can make from a small tile. A little bit of code which SiteSpinner looks after, and a small image file are all you need.
Here is the image brick.png from the Tutorials/Media folder (254 bytes):
And here is a brick wall tiled from that image (no extra image file, because Anti-Alias and Re-Render are both off):
It is possible to apply a tiled background to your whole page, or part of a page. See page backgrounds.
Render Background
If Render Background is on, (Geometry Editor > Options tab) anything in the background will be drawn into the picture to simulate transparency. In two cases you can't turn Render Background on:
For GIF the background, one color, will be truly transparent.
For PNG 32, the background colors will always show through the transparent sections of the image. So there is no need to simulate transparency.
If Render Background is off, the background will be not be drawn into the picture. One of two things will happen instead:
If the format is one that supports transparency (PNG 32, PNG 8 or GIF) then the background will be truly transparent
If the format does not support transparency (PNG, JPG or BMP) then the background will be filled with whatever color is set for the Page Background.
Image format and transparency
PNG 8 and GIF are the only formats that can use transparency that will work on all browsers. Regular PNG (PNG 24) does support transparency but since not all browsers respect it, we do not use it that way. PNG 32supports 256 levels of tranparency.
PNG 8 and GIF are 8 bits-per-pixel formats. That means they can only have a maximum of 256 colors so you may see some loss of color on larger images.
If you import a full color image and then change it to GIF or PNG-8, SiteSpinner will choose the best 256 colors. That will minimize the loss of color.
For GIF and PNG 8, true transparency won't show until you preview or publish. Preview and look at the images against the bricks and see how they differ from their workpage appearance. In each case, the image immediately below is an exact clone -- an identical image using the same image file.
Notice the improvement with PNG 32 on the right.
GIF (same image file)
PNG 32 (same image file)
PNG 8 (same image file)
PNG 8 and GIF show an issue with anti-alias too. The bottom images are anti-aliased against a white background, so pick up a halo of white around the logo part of the image. This is not a problem when the same image is used against a pale background. However, when placed against a much darker background, the bricks in this case, the anti-alias shows. If this is a problem, one solution is to use another anti-aliased image, this one anti-aliased against the colored background.