SiteSpinner Pro Tutorials banner
< Tutorials Home
Drop-Down Menus

See first: Special Effects and Buttons

The special effects in SiteSpinner make it possible to hide and show menu items, so allowing drop-down menus. In this tutorial, we detail, step-by-step, how to make a set of buttons suitable for a drop-down menu. We cover:

Introduction
Make or find your menu buttons
Check and adjust the z-order
Place the links
Mouse overs on menu items
Make a permanent group of the left-hand list
Make a mouse over on the left-hand list
Send the permanent group 'Back'
Make another mouse over on the left-hand list
Copy the button group
Make similar buttons
Edit buttons in group


Introduction
Drop-down menus can be tricky, so if you are having problems, we suggest building some test drop-downs on this page along side the existing ones. Preview at each step. As soon there is a deviation between what you have and what the tutorial has, that will be your problem area.

In this tutorial, we'll cover how to make drop-down menus like those just below. Preview to see the finished effect. Except for the text changes, the three stacks of buttons are identical.

SiteSpinner Pro logo
One
Two
Three
Four
MenuA
One
Two
Three
Four
MenuB
One
Two
Three
Four
MenuC
MenuA
MenuB
MenuC
One
One
One
Two
Two
Two
Three
Three
Three
Four
Four
Four
Make or find your menu buttons

We read the Buttons tutorial and made our own buttons from text objects. You could instead make your own button images, or you may find something you like elsewhere.

However you do it, start with two stacks of buttons like these on the right. In this case, we'll set the light blue buttons to be on top of the dark blue ones. One button pair for each page in the menu. Obviously, change the names on the buttons to suit your project.

Eventually, we will stack the two button sets exactly on top of each other, but while developing, it is helpful to keep the two stacks separated as shown, or just partly overlapped.
Menu
Menu
One
One
Two
Two
Three
Three
Four
Four
Z-order buttons
Check and adjust the z-order
Now is a good time to adjust the z-order of the buttons so that the light ones are on top of the dark ones -- nearer the front of the page. Check that the order is correct by overlapping the two sets temporarily. This is also a chance to adjust the positions of the two sets of buttons, so that when stacked, they will be exactly on top of each other. We chose to leave the buttons here partially overlapped, but you may find it easier to work without overlaps.
Menu
Menu
One
One
Two
Two
Three
Three
Four
Four
Menu
Menu
Place the links
Place the links on the four light number buttons -- these are just standard page links made with the Quick Editor.
Tool: Quick Editor
One
One
Two
Two
Three
Three
Four
Four
Mouse overs on menu items
Now, we'll make a set of mouse overs, one for each of the page (number) buttons. For each page, we want a mouse over on the dark menu button to show the light one, but only if the dark button is visible.
Setting menu item mouse over
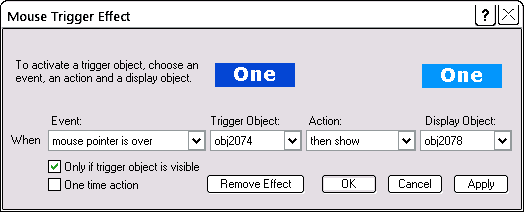
The image shows the Mouse Trigger Effect for button One. Check the box Only if trigger object is visible. Repeat this for the remaining three buttons.

For the action, instead of  "then show", sometimes you might use "hide it, and show". But here, when visible, the light button will completely cover the dark one, so there is no need to hide it further -- it is already hidden.

Menu
Menu
One
One
Two
Two
Three
Three
Four
Four
From here on, as you add each new effect, preview the project to see the results. Compare what happens now with what happened before the latest addition. Here, in preview, run your mouse down the left-hand set of buttons; it should make the right-hand numbers appear -- normally they will now be invisible.


Note the header name
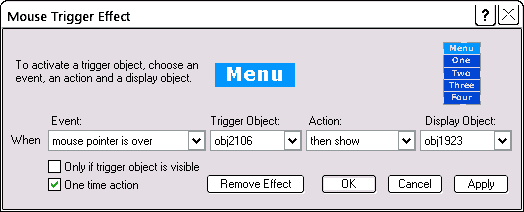
Make a note of the name of the menu header (light blue) of the left-hand list -- ours for this example will be obj2106. This makes it easier to set the next mouse effect.
Make a permanent group of the left-hand list

Make a permanent group of the left-hand list.


Send the permanent group 'Back'
Send the permanent group 'Back'. The button for this is on the bottom toolbar. The group should not be right 'To Back', but it needs to be at least far enough back for the interleaving to remain unchanged from what it was before. In particular, watch for the light blue menu items to all remain on top of the dark. You'll probably need to click 'Back' at least a few times to restore the interleaving.


We will now give the whole group effects to make it remain correctly visible while your visitor makes a menu selection, and to make it disappear afterwards.
Menu
One
Two
Three
Four
Menu
Z-order buttons
One
Two
Three
Four
Make a mouse over on the left-hand list
Make a mouse over from the left-hand menu header (whose name you noted just above) to its containing group -- the group we just made. Obj2106 is a member of the group obj1923. We want a one-time action to show the group when the mouse pointer is over the menu header.
Mous over on the left hand list
Check the box One time action.

Instead of "mouse pointer is over", you could use "mouse button is pressed on". This means that the menu drop-down would be activated with a click instead of a mouse over.

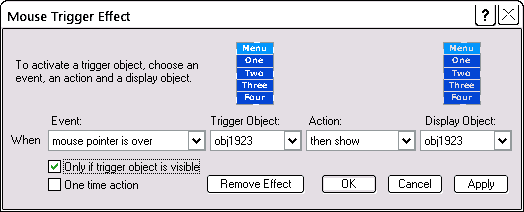
Preview again and notice that we have now hidden the left-hand set of buttons. But if you mouse over where the (invisible) menu header is, the buttons become visible and remain that way.
One
Two
Three
Four
Menu
Menu
One
Two
Three
Four
Make another mouse over on the left-hand list
We want the left hand list (obj1923 from the previous example) to show itself only when the mouse pointer is over it. At other times, we want the whole left-hand list to be invisible. The second mouse effect does that, hiding the list when you mouse off it.
Another mouse over on the left hand list
One
Two
Three
Four
Menu
Menu
This time, notice what happens when you mouse off the left-hand list.


And here is the finished set, with both sets of buttons now properly superimposed.


You may find it worth-while to make a group of the whole set. This is just a convenience -- it has no effect on the way the buttons operate.


One
Two
Three
Four
One
Two
Three
Four
Menu
Menu
One
Two
Three
Four
Menu
One
Two
Three
Four
Menu
Copy the button group
Copy and paste the group to make as many copies as you need.  Some menu items will need fewer or more pages, so you may need some adjustment after you copy. You can also include the group on different pages of your site, but in that case the group must be identical on all pages.


Make similar buttons
Having gone to a lot of effort to get your first group working and positioned just right, you may want some more buttons the same except for different text. You can do it the hard way by making a copy and un-grouping, or you can do in it situ like this:


Edit buttons in group
Once you have grouped some objects, it becomes more difficult to make minor adjustments -- e.g. to move something slightly. If you know the object name, you can call up the object in the Quick Editor, and make the adjustment while the object is still part of the group -- even see the effect immediately on the workpage. For more, see Manipulation: Edit objects of a group


See also:
Buttons -- how to make simple buttons
Special Effects -- how to create mouse overs
Form Use: Menu -- menus with Form Selection Lists

Tutorials banner